深入理解 Docker 容器

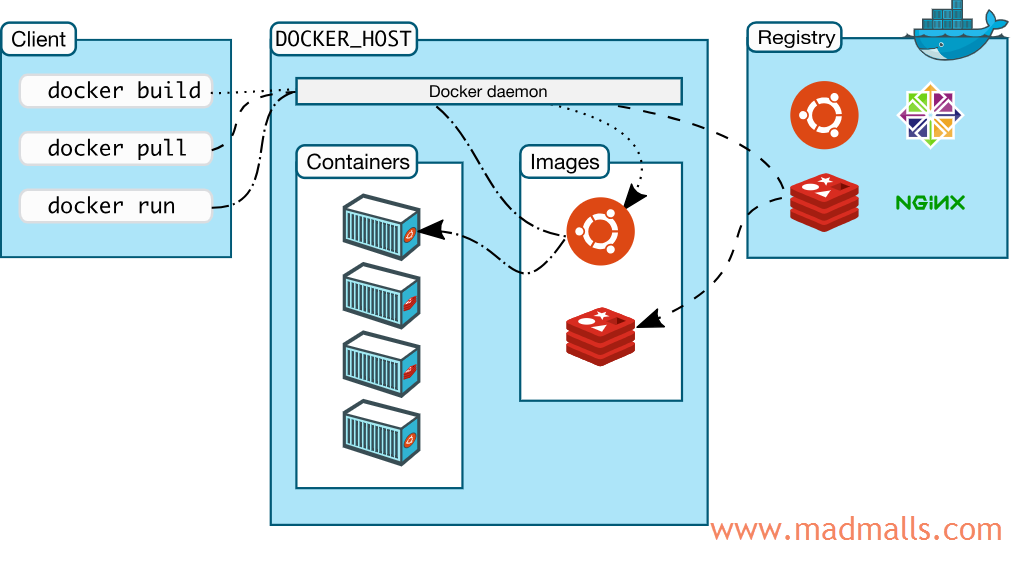
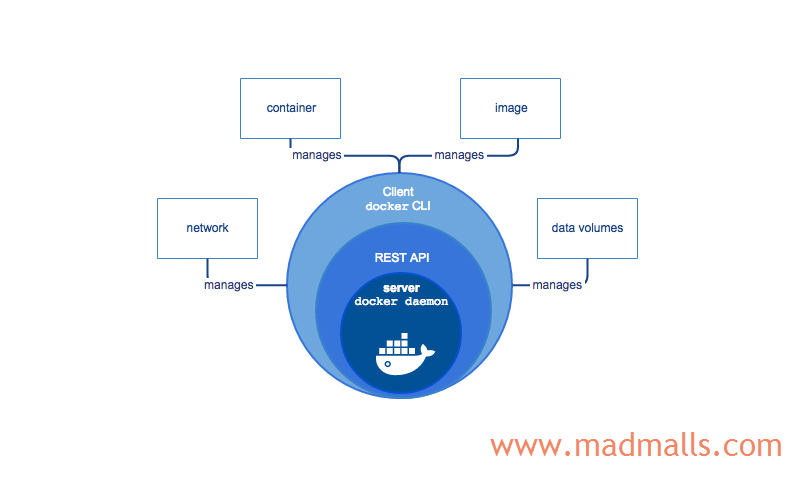
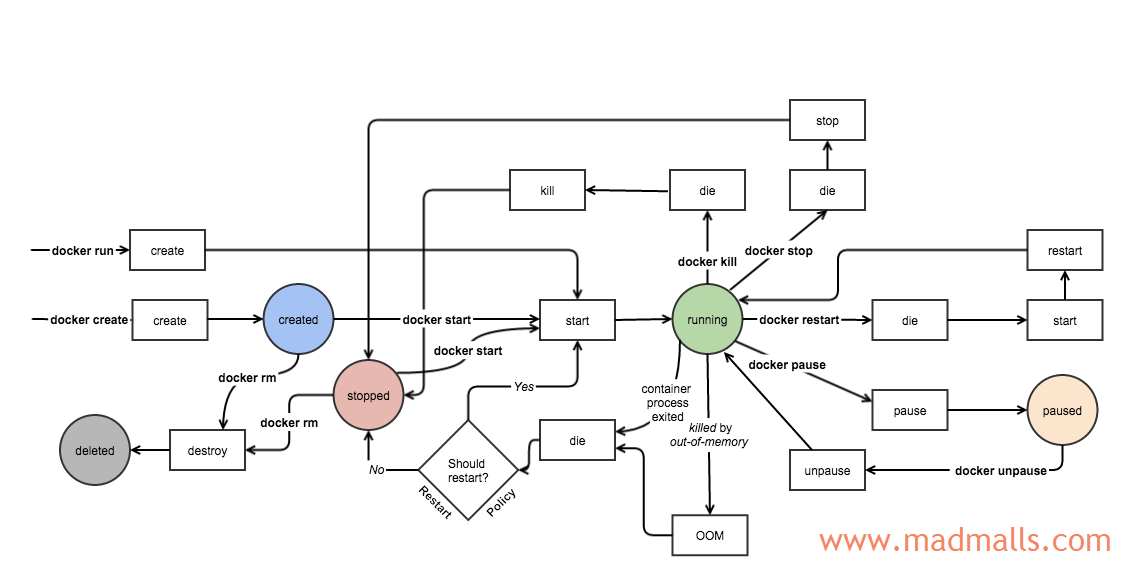
Synopsis: Linux 容器(Linux Containers,缩写为 LXC)并不是模拟出一个完整的操作系统,而是对进程进行隔离。Docker 属于 Linux 容器的一种封装,提供简单易用的容器使用接口,它是目前最流行的 Linux 容器解决方案。Docker 非常适合 devops 快速构建相同的运行环境、运行微服务架构等
Docker 是 Docker.Inc 公司开源的一个基于 LXC 技术之上构建的容器引擎,源代码 托管在 GitHub 上,使用 Go 语言开发,遵从 Apache 2.0 开源协议
1. 安装 Docker 社区版
如果你想安装 CentOS 系统,请参考: http://www.madmalls.com/blog/post/customize-centos-7-3-autoinstall-iso
1. 添加 aliyun-centos7 源 (国内访问速度快)、epel 源
[root@CentOS ~]# cd /etc/yum.repos.d
[root@CentOS ~]# rm -rf ./*
[root@CentOS ~]# wget -O /etc/yum.repos.d/CentOS-Base.repo http://mirrors.aliyun.com/repo/Centos-7.repo
[root@CentOS ~]# wget -O /etc/yum.repos.d/epel.repo http://mirrors.aliyun.com/repo/epel-7.repo

2. 增加docker-ce源
[root@CentOS ~]# yum-config-manager --add-repo http://mirrors.aliyun.com/docker-ce/linux/centos/docker-ce.repo

3. 安装必要的一些系统工具
[root@CentOS ~]# yum makecache fast
[root@CentOS ~]# yum install -y yum-utils device-mapper-persistent-data lvm2

4. 安装 Docker-CE
[root@CentOS ~]# yum install -y docker-ce
[root@CentOS ~]# systemctl start docker
[root@CentOS ~]# systemctl enable docker

5. 验证
[root@CentOS ~]# docker version
[root@CentOS ~]# docker info
注意:
Docker默认使用的docker0网段是172.17.0.0/16
[root@CentOS ~]# ip addr
...
3: docker0: <NO-CARRIER,BROADCAST,MULTICAST,UP> mtu 1500 qdisc noqueue state DOWN
    link/ether 02:42:97:6e:da:33 brd ff:ff:ff:ff:ff:ff
    inet 172.17.0.1/16 brd 172.17.255.255 scope global docker0
       valid_lft forever preferred_lft forever
如果你的局域网内部已经有该网段了,请先修改 docker0 之后再启动 Docker 服务,否则 SSH 会被断开
国内 Docker 镜像加速:
[root@CentOS ~]# vim /etc/docker/daemon.json
内容如下:

{
  "bip": "172.31.0.1/16",
  "registry-mirrors": [
    "https://registry.docker-cn.com"
  ]
}
然后,重启 Docker 服务进程即可!
2. Docker 基础概念
2.1 Image
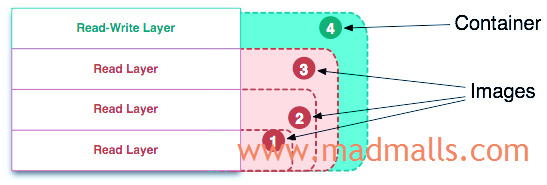
Docker 中的 镜像(Image) 是由多个 只读层(Read-Only Layer) 堆叠在一起,所形成的 统一的只读文件系统(Unioned Read-Only File System)。比如,下图中的镜像由 3 个只读层构成:

每一个 文件系统层(File System Layer) 都包含了 Id、指向父层的指针、元数据:

除了最下面的一层,其它层都会有一个指针指向父层。如果一个层没有这个指针,说明它处于最底层:
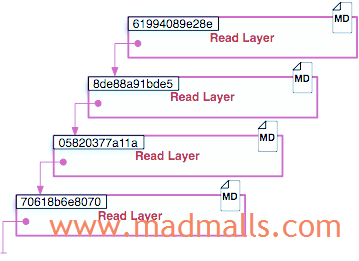
统一文件系统(UnionFS) 技术能够将不同的层整合成一个文件系统,它为这些层提供了一个统一的视角,这样就隐藏了多层的存在,在用户的角度看来,只存在一个文件系统
2.2 Container
Docker 中的 容器(Container) 与 Image 的区别是在多个只读层的最上面,多了一个 读写层(Read-Write Layer),最终形成了 统一的可读写文件系统(Unioned Read-Write File System)。比如,下图中容器由 3 个只读层加 1 个读写层构成:

注意:
容器=镜像+读写层
另外,只读层 和 读写层 都包含 元数据:

(1)运行时容器
运行时容器(Running Container) 是由 Unioned Read-Write File System、隔离的进程空间、包含在其中的进程 所组成。比如,下图展示了一个运行中的容器:

(2)写时复制(CoW)策略
写时复制(copy-on-write,简称 CoW) 是一种共享和复制文件的策略,可实现最高效率。假设一个文件在镜像的较低的只读层中,那么其它只读层或读写层想访问此文件时,会直接在文件所在层中读取,而无需复制到当前层中;如果其它层要修改此文件时(比如构建镜像或运行容器),首先会将此文件复制一份到当前层,然后再修改它。CoW 的好处是可以最小化 I/O、缩减后续层的大小
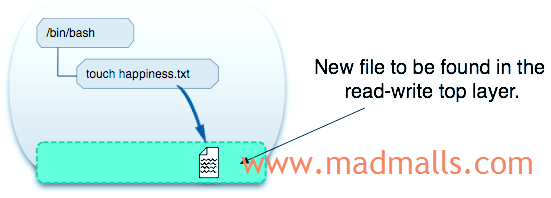
当一个 容器 中的进程对文件进行创建、修改或删除时,这些改变都 只作用于 可读写层(Read-Write Layer)。比如,下图展示了运行中的容器如何新建文件:
3. 镜像管理
Dokcer 管理镜像的命令为
docker image
[root@CentOS ~]# docker image --help

Usage:  docker image COMMAND

Manage images

Commands:
  build       Build an image from a Dockerfile
  history     Show the history of an image
  import      Import the contents from a tarball to create a filesystem image
  inspect     Display detailed information on one or more images
  load        Load an image from a tar archive or STDIN
  ls          List images
  prune       Remove unused images
  pull        Pull an image or a repository from a registry
  push        Push an image or a repository to a registry
  rm          Remove one or more images
  save        Save one or more images to a tar archive (streamed to STDOUT by default)
  tag         Create a tag TARGET_IMAGE that refers to SOURCE_IMAGE

Run 'docker image COMMAND --help' for more information on a command.
3.1 镜像列表
[root@CentOS ~]# docker image ls
或者:
[root@CentOS ~]# docker images  # 只列出顶层镜像
REPOSITORY          TAG                 IMAGE ID            CREATED             SIZE
   0.0.1               caddd4eb3c24        About an hour ago   89.7MB
...

或者:
[root@CentOS ~]# docker images -a  # 列出镜像的所有文件系统层
REPOSITORY          TAG                 IMAGE ID            CREATED             SIZE
   0.0.1               caddd4eb3c24        About an hour ago   89.7MB
<none>              <none>              8894a4ef4d93        About an hour ago   89.7MB
<none>              <none>              13a10f373fa4        About an hour ago   89.7MB
<none>              <none>              7c7ea499a390        About an hour ago   89.7MB
<none>              <none>              83828598cf8c        About an hour ago   79.1MB
<none>              <none>              512c36f28841        About an hour ago   79.1MB
...
3.2 搜索镜像
从 Docker 官方镜像仓库 https://hub.docker.com/ 中搜索指定名字的镜像,如果 OFFICIAL 那一列标记了 OK 则表示该镜像是由 Docker 官方提供的(存放目录为 https://hub.docker.com/u/library ),否则,是由第三方个人或组织提供的(比如 anapsix/alpine-java 前面的 anapsix 是仓库名,后面的 alpine-java 是镜像名)
[root@CentOS ~]# docker search alpine
NAME                                   DESCRIPTION                                     STARS               OFFICIAL            AUTOMATED
alpine                                 A minimal Docker image based on Alpine Linux…   5196                [OK]
mhart/alpine-node                      Minimal Node.js built on Alpine Linux           428
anapsix/alpine-java                    Oracle Java 8 (and 7) with GLIBC 2.28 over A…   405                                     [OK]
frolvlad/alpine-glibc                  Alpine Docker image with glibc (~12MB)          200                                     [OK]
gliderlabs/alpine                      Image based on Alpine Linux will help you wi…   180
alpine/git                             A  simple git container running in alpine li…   79                                      [OK]
kiasaki/alpine-postgres                PostgreSQL docker image based on Alpine Linux   43                                      [OK]
yobasystems/alpine-mariadb             MariaDB running on Alpine Linux [docker] [am…   38                                      [OK]
davidcaste/alpine-tomcat               Apache Tomcat 7/8 using Oracle Java 7/8 with…   34                                      [OK]
easypi/alpine-arm                      AlpineLinux for RaspberryPi                     32
envoyproxy/envoy-alpine                Images for tagged releases. Use envoy-alpine…   28
alpine/socat                           Run socat command in alpine container           27                                      [OK]
jfloff/alpine-python                   A small, more complete, Python Docker image …   24                                      [OK]
byrnedo/alpine-curl                    Alpine linux with curl installed and set as …   24                                      [OK]
etopian/alpine-php-wordpress           Alpine WordPress Nginx PHP-FPM WP-CLI           20                                      [OK]
hermsi/alpine-sshd                     Dockerize your OpenSSH-server upon a lightwe…   18                                      [OK]
hermsi/alpine-fpm-php                  Dockerize your FPM PHP 7.3 upon a lightweigh…   16                                      [OK]
davidcaste/alpine-java-unlimited-jce   Oracle Java 8 (and 7) with GLIBC 2.21 over A…   11                                      [OK]
zenika/alpine-chrome                   Chrome running in headless mode in a tiny Al…   11                                      [OK]
graze/php-alpine                       Smallish php7 alpine image with some common …   11                                      [OK]
spotify/alpine                         Alpine image with `bash` and `curl`.            9                                       [OK]
tenstartups/alpine                     Alpine linux base docker image with useful p…   8                                       [OK]
alpine/httpie                          httpie running in docker alpine (python3+pip…   6                                       [OK]
functions/alpine                       Alpine Linux / BusyBox with the OpenFaaS wat…   4
govuk/gemstash-alpine                  Gemstash server running on Alpine               3                                       [OK]
3.3 拉取镜像
需要指定 [REPOSITORY[:TAG]],如果是 Docker 官方提供的镜像,则可以省略 REPOSITORY中的 library,如果不指定 TAG 时默认拉取 latest 最新版本的镜像文件:
[root@CentOS ~]# docker pull alpine
或者:
[root@CentOS ~]# docker pull library/alpine:latest
Using default tag: latest
latest: Pulling from library/alpine
bdf0201b3a05: Pull complete
Digest: sha256:28ef97b8686a0b5399129e9b763d5b7e5ff03576aa5580d6f4182a49c5fe1913
Status: Downloaded newer image for alpine:latest

[root@CentOS ~]# docker image ls
REPOSITORY          TAG                 IMAGE ID            CREATED             SIZE
alpine              latest              cdf98d1859c1        11 days ago         5.53MB
可以使用
docker inspect <image-id>查看镜像元信息:
3.4 删除镜像

1. 移除镜像中最上面的文件系统层
[root@CentOS ~]# docker rmi <image-id>
或者:
[root@CentOS ~]# docker image rm <image-id>
或者:
[root@CentOS ~]# docker image rmi <image-id>
或者:
[root@CentOS ~]# docker image remove <image-id>

2. 强制移除镜像中间指定的文件系统层
[root@CentOS ~]# docker rmi -f <image-id>

3. 批量删除构建失败时的 <none> 镜像
[root@CentOS ~]# docker rmi -f $(docker images -f "dangling=true" -q)
3.5 构建镜像
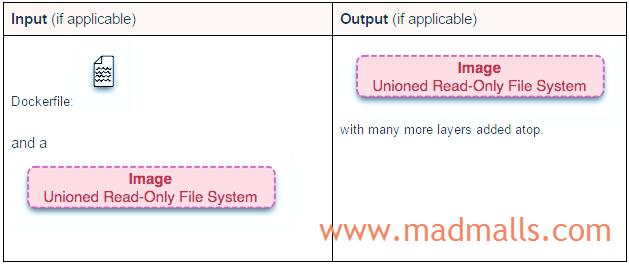
docker build 命令会根据 Dockerfile 文件中的 FROM 指令获取到基础镜像,然后执行一次或多次如下过程:
docker run(即docker create和docker start),请参考本文 4.3 章节- 修改可读写的文件系统层(RUN 指令等)
docker commit,请参考本文 4.7 章节

构建完成时,会自己删除中间过程中所创建的容器!
(1)Dockerfile
接下来演示如何构建包含 Flask 框架 hello-world 示例的镜像,项目的文件如下:
[root@CentOS docker-demo]# ls -al
total 20
drwxr-xr-x   4 root root  115 Apr 22 11:56 .
dr-xr-x---. 10 root root 4096 Apr 22 11:56 ..
-rw-r--r--   1 root root  112 Apr 22 11:48 app.py
-rw-r--r--   1 root root  171 Apr 22 11:56 Dockerfile
-rw-r--r--   1 root root   20 Apr 22 11:49 .dockerignore
drwxr-xr-x   2 root root   32 Apr 22 11:48 __pycache__
-rw-r--r--   1 root root   94 Apr 22 11:51 requirements.txt
drwxr-xr-x   5 root root  100 Apr 22 11:47 venv3
[root@CentOS docker-demo]






2 条评论
评论者的用户名
评论时间shishijia
2020-05-19T14:17:47Z大神,添加 aliyun-centos7 源中,能直接rm -rf ./*吗,我看里面除了centos还要mysql ngix.repo
Madman shishijia Author
2020-05-19T14:22:18Z先备份
/etc/yum.repos.d目录, https://developer.aliyun.com/mirror/centos?spm=a2c6h.13651102.0.0.3e221b114PFxQ0