
"动"话 Git (1): 深入理解 Git 的核心思想

Synopsis: 在《"动"话 Git》系列的第一篇中,我们将深入研究 Git 这一版本控制系统的核心思想与原理。通过生动的动态图片和精彩的图解,我们将揭示 Git 在背后的工作机制,剖析其独特的版本管理思想。无论你是初学者还是有经验的开发者,本文将为你提供清晰的视角,帮助你更深入地理解Git,为有效的团队协作和代码管理打下坚实的基础。让我们一同踏上这段有趣而充满发现的 Git 之旅!
1、Git 基础概念
1.1 三棵树架构

在 Git 版本控制系统中,存在三个主要的区域(或称为"树"),用于管理文件的不同阶段和状态。这三个区域分别是:
working directory(工作区): 这是你电脑上实际存放项目文件的地方,是从 Git 仓库的压缩数据库中检出所有文件的工作副本(提取目录结构和文件到磁盘上)。 通常,你会修改、删除和添加文件,每当完成了一个阶段的目标,想要将记录保存下来时,就将它提交到仓库。工作区的每一个文件只有两种状态:已跟踪: 是指那些被纳入了版本控制的文件,在上一次快照(提交)中有它们的记录,在工作一段时间后, 它们的状态可能是未修改、已修改或已放入暂存区。简而言之,已跟踪的文件就是 Git 已经知道的文件。编辑过某些文件之后,由于自上次提交后你对它们做了修改,Git 将它们标记为已修改文件。 在工作时,你可以选择性地将这些修改过的文件放入暂存区,然后提交所有已暂存的修改,如此反复。未跟踪(Untracked files): 工作区中除已跟踪文件外的其它所有文件都属于未跟踪文件,它们既不存在于上次快照的记录中,也没有被放入暂存区
staging area/index(暂存区): 在提交前,你可以选择性地将工作目录中的文件添加到暂存区,形成一个将要提交的快照(.git/index文件)repository(版本库): 是 Git 用来保存项目的元数据和对象数据库的地方(.git/目录),包括你的项目历史。这是 Git 中最重要的部分,从其它计算机克隆仓库时,复制的就是这里的数据
Git 管理的文件有三种状态:
已修改(modified): 表示修改了文件,但还没保存到版本库中已暂存(staged): 表示对一个已修改文件的当前版本做了标记,使之包含在下次提交的快照中已提交(committed): 表示数据已经安全地保存到版本库中
如果 Git 目录中保存着特定版本的文件,就属于已提交状态。如果文件已修改并放入暂存区,就属于已暂存状态。如果自上次检出后,作了修改但还没有放到暂存区域,就是已修改状态
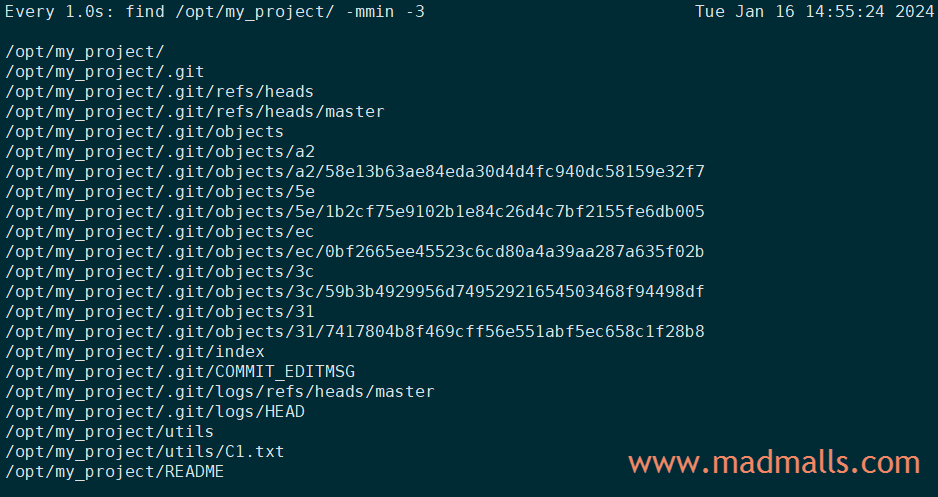
[root@cscs-100-116-20-141 ~]# mkdir /opt/my_project
[root@cscs-100-116-20-141 ~]# cd /opt/my_project
[root@cscs-100-116-20-141 my_project]# git init
Initialized empty Git repository in /opt/my_project/.git/
[root@cscs-100-116-20-141 my_project]# tree
.

0 directories, 0 files
[root@cscs-100-116-20-141 my_project]# ls -al
total 0
drwxr-x---   3 root root  18 Jan 15 14:08 .
drwxr-xr-x. 13 root root 169 Jan 15 14:08 ..
drwxr-x---   7 root root 119 Jan 15 14:08 .git
[root@cscs-100-116-20-141 my_project]# tree .git/
.git/
├── branches
├── config
├── description
├── HEAD
├── hooks
│   ├── applypatch-msg.sample
│   ├── commit-msg.sample
│   ├── post-update.sample
│   ├── pre-applypatch.sample
│   ├── pre-commit.sample
│   ├── prepare-commit-msg.sample
│   ├── pre-push.sample
│   ├── pre-rebase.sample
│   └── update.sample
├── info
│   └── exclude
├── objects
│   ├── info
│   └── pack
└── refs
    ├── heads
    └── tags

9 directories, 13 files
1.2 典型工作流程
(1) 在 工作区 中新增/修改/删除文件
(2) 将你想要下次提交的更改 选择性地暂存,这样只会将更改的部分添加到 暂存区
(3) 提交更新,找到暂存区的文件,将快照永久性存储到 Git 版本库 中
2、Git 核心思想和原理
2.1 保证完整性
在存储任何文件内容或目录结构前,Git 底层都会其对计算校验和(SHA-1 哈希,产生 40 位十六进制字符串),Git 数据库中保存的信息都是以 文件内容 的哈希值来索引,而不是 文件名
Git 四种基本 objects:
blob: 表示二进制数据,存储了项目中已纳管的每个文件的实际内容,但不包含文件名等其它元数据信息。它们是不可修改的,如果文件内容改变,就会创建一个新的 blob objecttree: 用于组织和存储项目的文件结构,形成目录层次,其中包含了文件名、文件类型和对应的 blob 或者子目录的引用commit: 代表一次修改的集合。每个 commit object 都包含了指向一个内容 snapshot(快照)的指针,还包含了作者的姓名和邮箱、提交时输入的信息以及指向它的父对象的指针。首次提交产生的提交对象没有父对象,普通提交操作产生的提交对象有一个父对象,而由多个分支合并产生的提交对象有多个父对象tag: 是一个永久指向某个提交记录的引用,通常用于标记项目的里程碑或者版本。tag 是静态的,不会随着新的提交而移动。而分支很容易被改变(当有新的提交时它会移动;也可以被人为移动),大部分分支还只是临时的,并且还一直在变
在工作目录新增文件后,Git 会比较暂存区和工作目录,发现文件还没有添加到暂存区,文件状态显示为 Untracked files:
[root@cscs-100-116-20-141 my_project]# echo "init" > README
[root@cscs-100-116-20-141 my_project]# git status
# On branch master
#
# Initial commit
#
# Untracked files:
#   (use "git add <file>..." to include in what will be committed)
#
#    README
nothing added to commit but untracked files present (use "git add" to track)
执行 git add README 添加文件到暂存区后(文件状态显示为 Changes to be committed),会新增:
.git/objects/b1/目录.git/objects/b1/b716105590454bfc4c0247f193a04088f39c7f文件:当 README 文件被 git 管理后会所创建的 blob object,文件状态变更为Changes to be committed。blob object id 是 Git 通过计算 SHA-1 哈希值(40 位)得到,子目录b1是哈希值的前两位、文件名b716105590454bfc4c0247f193a04088f39c7f是后续的哈希值,所以完整的哈希值是b1b716105590454bfc4c0247f193a04088f39c7f,而 git 命令中一般取前几位即可(比如b1b7161)、不会造成唯一标识冲突.git/index文件:暂存区或 index 索引文件。我们无法直接查看.git/index文件的内容,可以使用 git 提供的git ls-files -s命令查看:
[root@cscs-100-116-20-141 my_project]# git status
# On branch master
#
# Initial commit
#
# Changes to be committed:
#   (use "git rm --cached <file>..." to unstage)
#
#    new file:   README

[root@cscs-100-116-20-141 my_project]# git ls-files
README

# -s, --stage           show staged contents' object name in the output
# 输出行中的 100644 由两部分组成,100 表示这是一个普通文件,644 是文件权限;b1b716105590454bfc4c0247f193a04088f39c7f 是 blob object 的 SHA-1 哈希值
[root@cscs-100-116-20-141 my_project]# git ls-files -s
100644 b1b716105590454bfc4c0247f193a04088f39c7f 0    README
我们无法正常读取该 blob object 文件内容,可以使用 git 提供的 git cat-file 命令查看:
[root@cscs-100-116-20-141 my_project]# file /opt/my_project/.git/objects/b1/b716105590454bfc4c0247f193a04088f39c7f
/opt/my_project/.git/objects/b1/b716105590454bfc4c0247f193a04088f39c7f: VAX COFF executable not stripped

[root@cscs-100-116-20-141 my_project]# git cat-file -h
usage: git cat-file (-t|-s|-p|<type>) <object>
<type> can be one of: blob, tree, commit, tag
    -t                    show object type
    -s                    show object size
    -p                    pretty-print object's content

[root@cscs-100-116-20-141 my_project]# git cat-file -t b1b7161
blob
[root@cscs-100-116-20-141 my_project]# git cat-file -s b1b7161
5
[root@cscs-100-116-20-141 my_project]# git cat-file -p b1b7161
init

[root@cscs-100-116-20-141 my_project]# ls -lh README   # init 共 4 个 ASCII 字符,加上换行符 \n,所以一共是 5 个字节
-rw-r----- 1 root root 5 Jan 15 14:12 README
在 git 中,SHA-1 值计算是在原始文件内容(init\n)前加上一个标头(对于 blob object,标头是 <object type> <object size>\x00),然后计算其 SHA-1 哈希值:
[root@cscs-100-116-20-141 my_project]# python
Python 2.7.5 (default, Nov 16 2020, 22:23:17)
[GCC 4.8.5 20150623 (Red Hat 4.8.5-44)] on linux2
Type "help", "copyright", "credits" or "license" for more information.
>>> import zlib
>>>
>>> with open('/opt/my_project/.git/objects/b1/b716105590454bfc4c0247f193a04088f39c7f', 'rb') as f:
...     content = f.read()
...     f.seek(0)  # Move the file pointer back to the beginning
...     decompressed_content = zlib.decompress(content)
...
>>> print type(decompressed_content)
<type 'str'>
>>> print repr(decompressed_content)
'blob 5\x00init\n'
其实,我们也可以自己根据这个规则,计算出 SHA-1 哈希值:
[root@cscs-100-116-20-141 my_project]# python
Python 2.7.5 (default, Nov 16 2020, 22:23:17)
[GCC 4.8.5 20150623 (Red Hat 4.8.5-44)] on linux2
Type "help", "copyright", "credits" or "license" for more information.
>>> import hashlib
>>>
>>> content = b'init\n'
>>> header = 'blob {}\x00'.format(len(content)).encode('utf-8')
>>> full_content = header + content
>>> print type(full_content)
<type 'str'>
>>> print repr(full_content)
'blob 5\x00init\n'
>>> sha1_hash = hashlib.sha1(full_content).hexdigest()
>>> print type(sha1_hash)
<type 'str'>
>>> print repr(sha1_hash)
'b1b716105590454bfc4c0247f193a04088f39c7f'
或者使用 Linux 命令,注意使用 -n 选项来确保不在输入的结尾添加换行符,而 -e 选项用于解释转义字符 \x00:
[root@cscs-100-116-20-141 my_project]# echo -n -e 'blob 5\x00init\n' | sha1sum
b1b716105590454bfc4c0247f193a04088f39c7f  -
注意: 计算 SHA-1 哈希值时并不依赖文件名,所以只要文件内容一致,就不会创建新的 blob object,提高了 git 的存储效率
比如我们可以尝试执行 echo "init" > init.txt && git add init.txt 再观察 .git/objects/ 并不会新增对象!由于软链接文件的内容是被链接的文件名称,所以会继续创建新的 blob object:
[root@cscs-100-116-20-141 my_project]# ln -s README help.txt
[root@cscs-100-116-20-141 my_project]# ls -l
total 8
lrwxrwxrwx 1 root root 6 Jan 16 14:29 help.txt -> README
-rw-r----- 1 root root 5 Jan 16 14:27 init.txt
-rw-r----- 1 root root 5 Jan 16 14:23 README
[root@cscs-100-116-20-141 my_project]# git status
# On branch master
#
# Initial commit
#
# Changes to be committed:
#   (use "git rm --cached <file>..." to unstage)
#
#    new file:   README
#    new file:   init.txt
#
# Untracked files:
#   (use "git add <file>..." to include in what will be committed)
#
#    help.txt
[root@cscs-100-116-20-141 my_project]# git add help.txt
[root@cscs-100-116-20-141 my_project]# tree -a
.
├── .git
│   ├── branches
│   ├── config
│   ├── description
│   ├── HEAD
│   ├── hooks
│   │   ├── applypatch-msg.sample
│   │   ├── commit-msg.sample
│   │   ├── post-update.sample
│   │   ├── pre-applypatch.sample
│   │   ├── pre-commit.sample
│   │   ├── prepare-commit-msg.sample
│   │   ├── pre-push.sample
│   │   ├── pre-rebase.sample
│   │   └── update.sample
│   ├── index
│   ├── info
│   │   └── exclude
│   ├── objects
│   │   ├── 10
│   │   │   └── 0b93820ade4c16225673b4ca62bb3ade63c313
│   │   ├── b1
│   │   │   └── b716105590454bfc4c0247f193a04088f39c7f
│   │   ├── info
│   │   └── pack
│   └── refs
│       ├── heads
│       └── tags
├── help.txt -> README
├── init.txt
└── README

12 directories, 19 files

# 注意: README 和 init.txt 文件内容一致,所以指向同一个 blob object
[root@cscs-100-116-20-141 my_project]# git ls-files -s
100644 b1b716105590454bfc4c0247f193a04088f39c7f 0    README
120000 100b93820ade4c16225673b4ca62bb3ade63c313 0    help.txt
100644 b1b716105590454bfc4c0247f193a04088f39c7f 0    init.txt

[root@cscs-100-116-20-141 my_project]# git cat-file -t 100b938
blob
[root@cscs-100-116-20-141 my_project]# git cat-file -s 100b938
6
[root@cscs-100-116-20-141 my_project]# git cat-file -p 100b938
README   # 注意:没有换行符,help.txt 里面是被链接的文件名

[root@cscs-100-116-20-141 my_project]# echo -n -e 'blob 6\x00README' | sha1sum
100b93820ade4c16225673b4ca62bb3ade63c313  -
2.2 直接记录快照,而非差异比较
执行 git commit -m "init repo" 命令进行第一次提交:
文件变化如下:
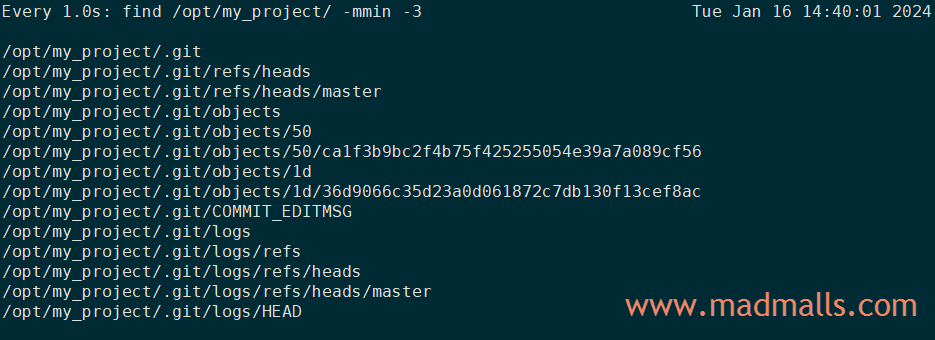
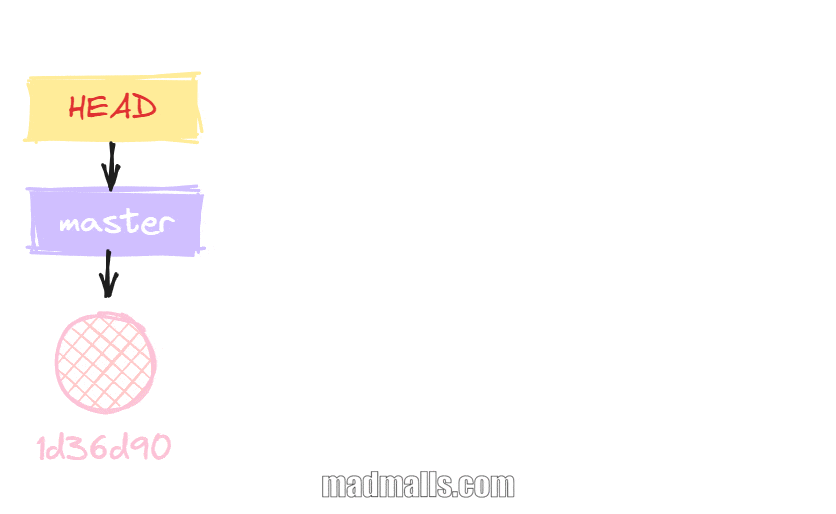
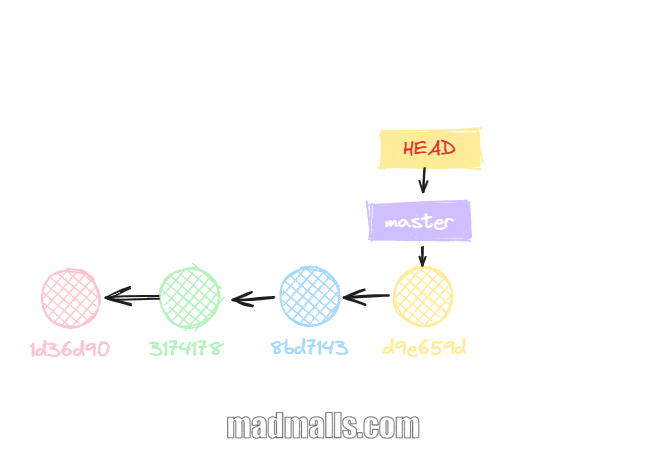
# 自动创建了 master 分支;
[root@cscs-100-116-20-141 my_project]# git commit -m "init repo"
[master (root-commit) 1d36d90] init repo
 3 files changed, 3 insertions(+)
 create mode 100644 README
 create mode 120000 help.txt
 create mode 100644 init.txt
[root@cscs-100-116-20-141 my_project]# git branch -av
* master 1d36d90 init repo
[root@cscs-100-116-20-141 my_project]# cat /opt/my_project/.git/refs/heads/master
1d36d9066c35d23a0d061872c7db130f13cef8ac
[root@cscs-100-116-20-141 my_project]# git cat-file -t 1d36d90
commit
[root@cscs-100-116-20-141 my_project]# git cat-file -p 1d36d90
tree 50ca1f3b9bc2f4b75f425255054e39a7a089cf56
author Madman <Madman@163.com> 1705387176 +0800
committer Madman <Madman@163.com> 1705387176 +0800

init repo
[root@cscs-100-116-20-141 my_project]# git cat-file -t 50ca1f3
tree
[root@cscs-100-116-20-141 my_project]# git cat-file -p 50ca1f3
100644 blob b1b716105590454bfc4c0247f193a04088f39c7f    README
120000 blob 100b93820ade4c16225673b4ca62bb3ade63c313    help.txt
100644 blob b1b716105590454bfc4c0247f193a04088f39c7f    init.txt

# 提交信息和日志
[root@cscs-100-116-20-141 my_project]# cat /opt/my_project/.git/COMMIT_EDITMSG
init repo
[root@cscs-100-116-20-141 my_project]# cat /opt/my_project/.git/logs/refs/heads/master
0000000000000000000000000000000000000000 1d36d9066c35d23a0d061872c7db130f13cef8ac Madman <Madman@163.com> 1705387176 +0800    commit (initial): init repo
[root@cscs-100-116-20-141 my_project]# cat /opt/my_project/.git/logs/HEAD
0000000000000000000000000000000000000000 1d36d9066c35d23a0d061872c7db130f13cef8ac Madman <Madman@163.com> 1705387176 +0800    commit (initial): init repo
第一次提交后的对象关系图:

在工作目录下:(1) 新建子目录和文件 (2) 修改 README 的内容,文件状态变更为 Changes not staged for commit,然后进行第二次提交:
文件变化如下:
[root@cscs-100-116-20-141 my_project]# cat /opt/my_project/.git/refs/heads/master
317417804b8f469cff56e551abf5ec658c1f28b8
[root@cscs-100-116-20-141 my_project]# git cat-file -t 3174178
commit
[root@cscs-100-116-20-141 my_project]# git cat-file -p 3174178
tree 3c59b3b4929956d74952921654503468f94498df
parent 1d36d9066c35d23a0d061872c7db130f13cef8ac
author Madman <Madman@163.com> 1705388017 +0800
committer Madman <Madman@163.com> 1705388017 +0800

Add C1.txt; modify README
[root@cscs-100-116-20-141 my_project]# git cat-file -t 3c59b3b
tree
[root@cscs-100-116-20-141 my_project]# git cat-file -p 3c59b3b
100644 blob 5e1b2cf75e9102b1e84c26d4c7bf2155fe6db005    README
120000 blob 100b93820ade4c16225673b4ca62bb3ade63c313    help.txt
100644 blob b1b716105590454bfc4c0247f193a04088f39c7f    init.txt
040000 tree ec0bf2665ee45523c6cd80a4a39aa287a635f02b    utils
[root@cscs-100-116-20-141 my_project]# git cat-file -t ec0bf26
tree
[root@cscs-100-116-20-141 my_project]# git cat-file -p ec0bf26
100644 blob a258e13b63ae84eda30d4d4fc940dc58159e32f7    C1.txt
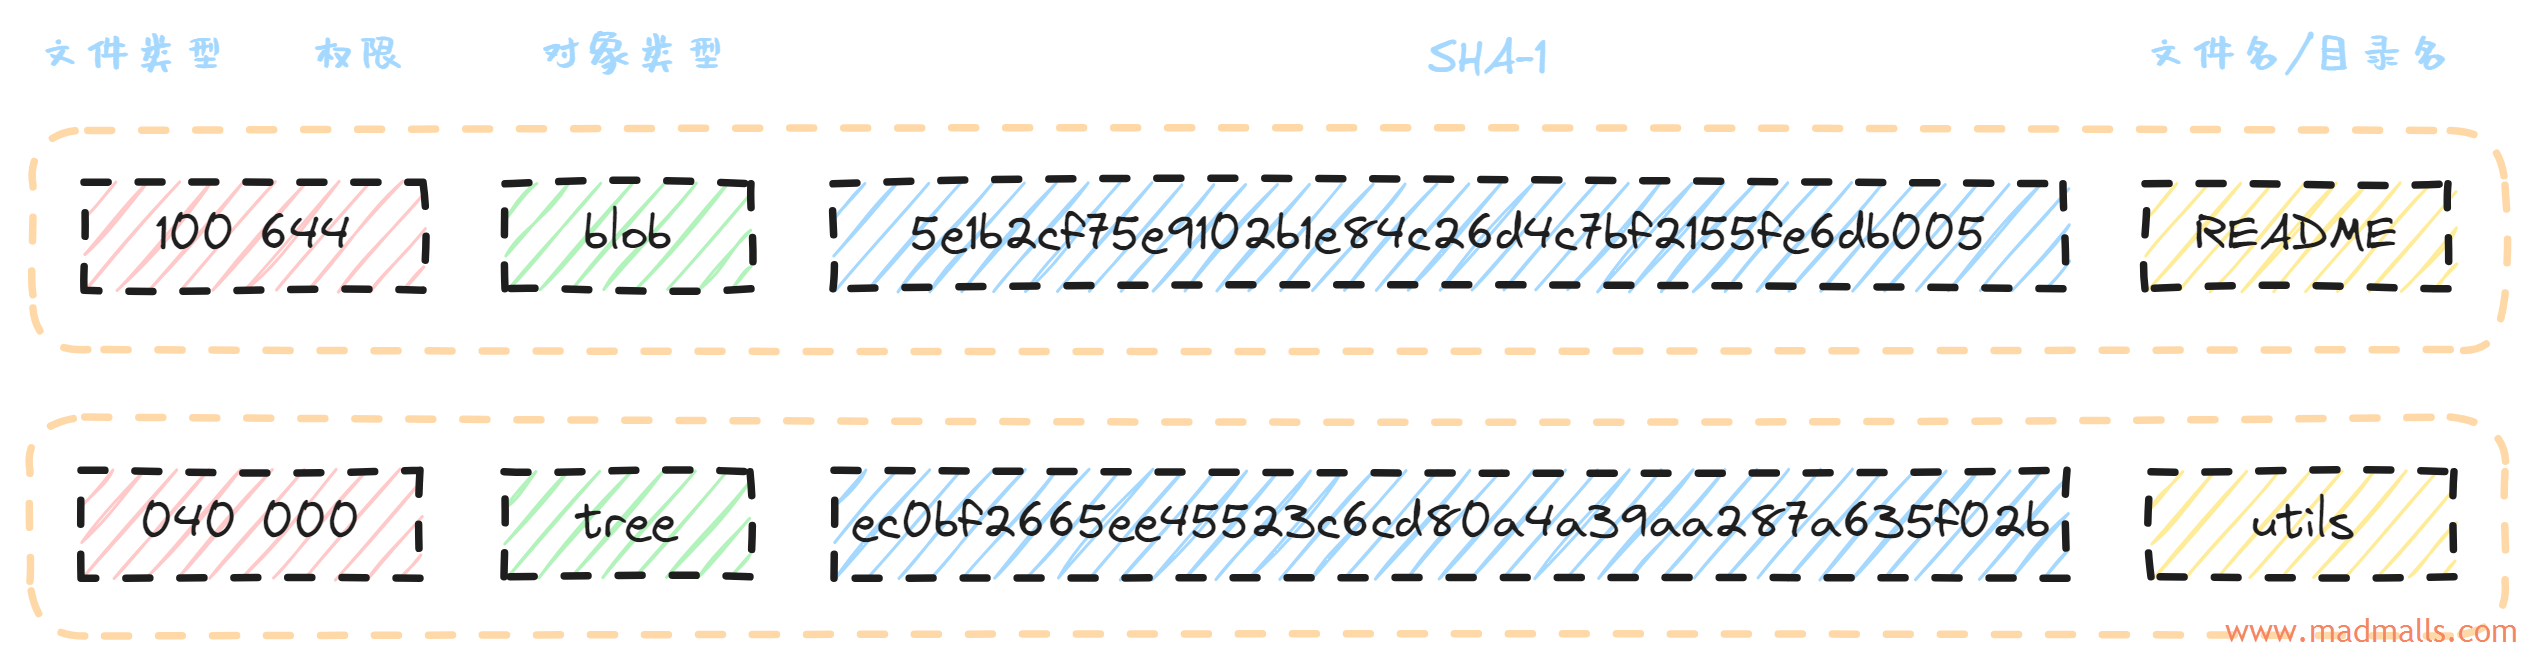
git cat-file -p 打印对象内容的说明:
本次提交的对象关系图:
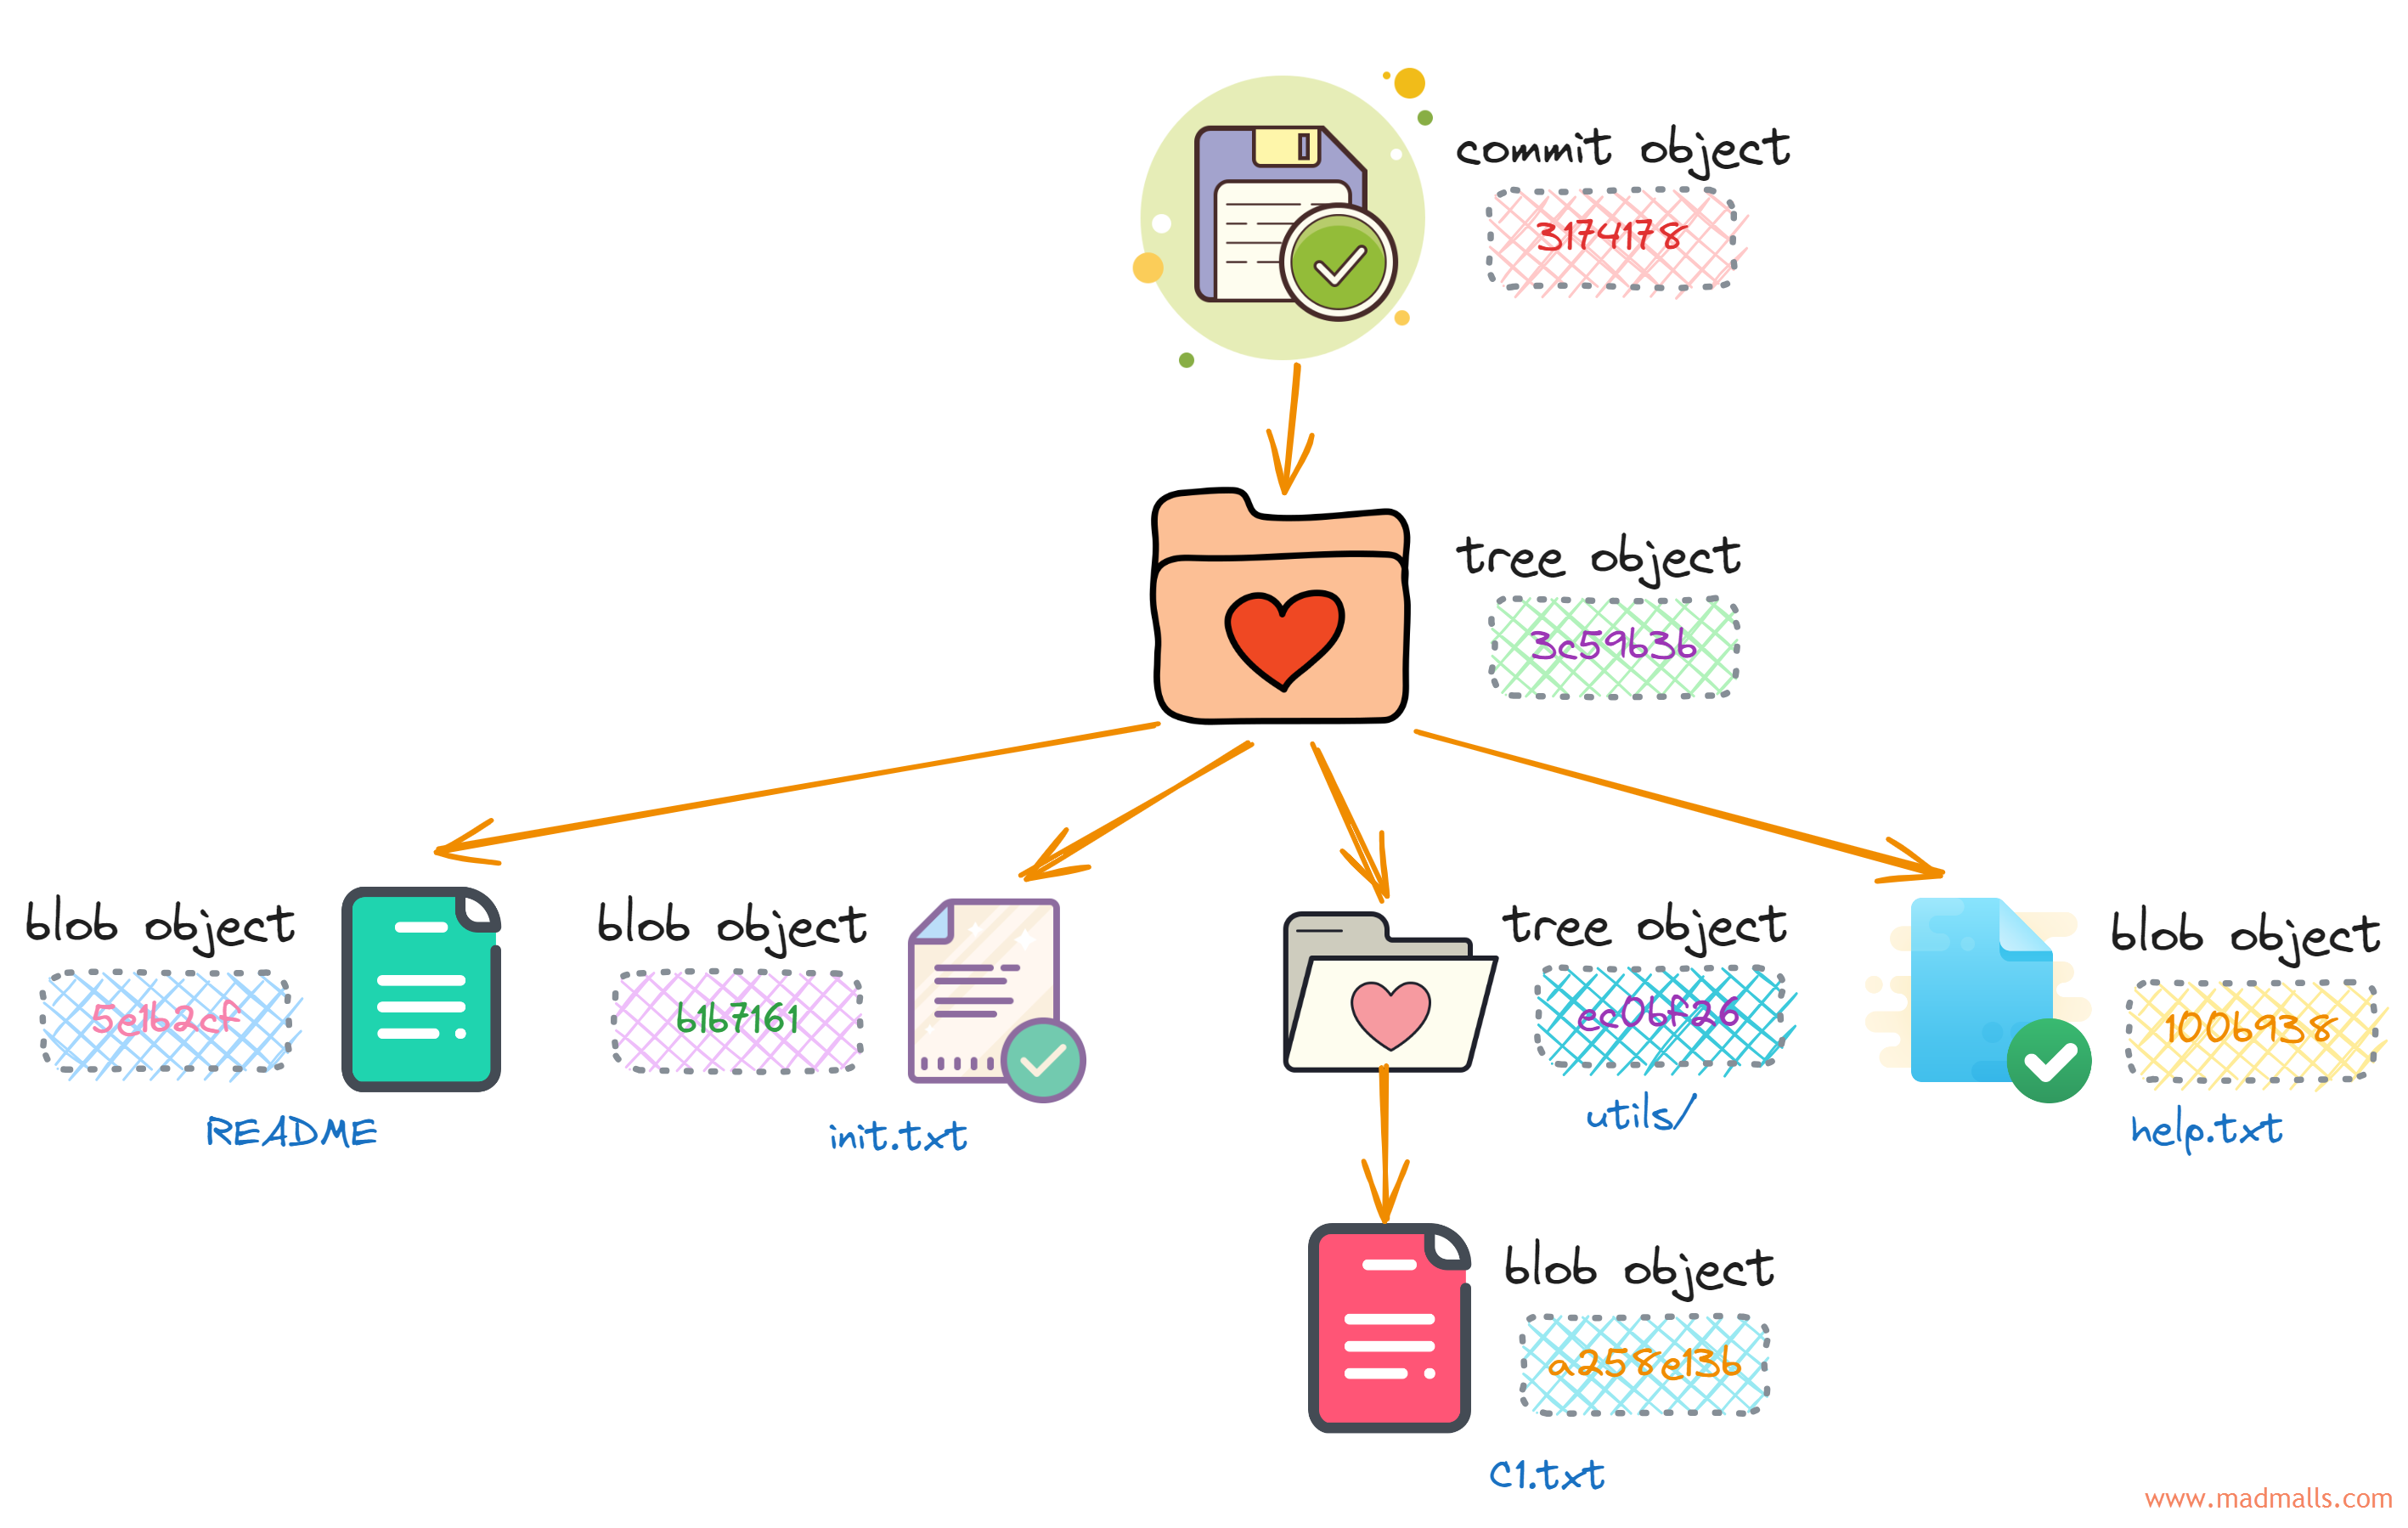
注意: 由于 README 文件内容被修改了,所以产生了新的 blob object(5e1b2cf)
SVN 等版本控制系统通常称作 基于差异(delta-based) 的版本控制,以文件变更列表的方式存储信息,先存储包含所有文件的初始版本,然后每个版本存储每个文件与初始版本的差异
Git 更像是把数据看作是对 小型文件系统 的一系列 快照(Snapshots)。 在 Git 中,每当你提交更新或保存项目状态时,它就会对当时的全部文件创建一个快照并保存这个快照的索引(commit object)。为了效率,如果文件没有修改,Git 不再重新存储该文件,而是只保留一个链接指向之前存储的文件(上图中的 init.txt 和 help.txt 所指向的对象不变)
2.3 保证数据安全
你执行的 Git 操作,几乎只往 Git 数据库中 添加 数据。你很难使用 Git 命令从数据库中 删除 数据,也就是说 Git 几乎不会执行任何可能导致文件不可恢复的操作。和别的版本控制系统一样,更新的内容 未提交 时有可能丢失(比如工作区的修改还未提交就执行了 git reset --hard)。但是一旦你提交快照到 Git 中, 就不会再丢失数据(本地仓库),如果你定期推送数据库到其它远程仓库的话就更安全了
# 1.添加 C2.txt 文件到暂存区,产生 blog object(18b5e4c8c8a5568eb522f1599714946678c2d8bd),然后提交到仓库
[root@cscs-100-116-20-141 my_project]# echo "Add C2.txt on master" > utils/C2.txt
[root@cscs-100-116-20-141 my_project]# git add utils/C2.txt
[root@cscs-100-116-20-141 my_project]# git commit -m "Add C2.txt"
[master 8bd7143] Add C2.txt
 1 file changed, 1 insertion(+)
 create mode 100644 utils/C2.txt
[root@cscs-100-116-20-141 my_project]# git ls-files -s
100644 5e1b2cf75e9102b1e84c26d4c7bf2155fe6db005 0    README
120000 100b93820ade4c16225673b4ca62bb3ade63c313 0    help.txt
100644 b1b716105590454bfc4c0247f193a04088f39c7f 0    init.txt
100644 a258e13b63ae84eda30d4d4fc940dc58159e32f7 0    utils/C1.txt
100644 18b5e4c8c8a5568eb522f1599714946678c2d8bd 0    utils/C2.txt

# 2.从工作区和暂存区移除文件
[root@cscs-100-116-20-141 my_project]# git rm utils/C2.txt
rm 'utils/C2.txt'
[root@cscs-100-116-20-141 my_project]# git commit -m "delete C2.txt"
[master 84d728f] delete C2.txt
 1 file changed, 1 deletion(-)
 delete mode 100644 utils/C2.txt
[root@cscs-100-116-20-141 my_project]# git ls-files -s
100644 5e1b2cf75e9102b1e84c26d4c7bf2155fe6db005 0    README
120000 100b93820ade4c16225673b4ca62bb3ade63c313 0    help.txt
100644 b1b716105590454bfc4c0247f193a04088f39c7f 0    init.txt
100644 a258e13b63ae84eda30d4d4fc940dc58159e32f7 0    utils/C1.txt
# 但是该文件还是被 Git 追踪管理的,blog object 也还在
[root@cscs-100-116-20-141 my_project]# ls -l .git/objects/18/
total 4
-r--r----- 1 root root 37 Jan 17 09:59 b5e4c8c8a5568eb522f1599714946678c2d8bd

# 3.如果后悔了,还可以找回 C2.txt
[root@cscs-100-116-20-141 my_project]# git reset HEAD^
Unstaged changes after reset:
D    utils/C2.txt

# [deleted: utils/C2.txt] 这个差异是在工作区、还没添加到暂存区:
[root@cscs-100-116-20-141 my_project]# git diff --cached
[root@cscs-100-116-20-141 my_project]# git status
# On branch master
# Changes not staged for commit:
#   (use "git add/rm <file>..." to update what will be committed)
#   (use "git checkout -- <file>..." to discard changes in working directory)
#
#    deleted:    utils/C2.txt
#
no changes added to commit (use "git add" and/or "git commit -a")
[root@cscs-100-116-20-141 my_project]# git diff
diff --git a/utils/C2.txt b/utils/C2.txt
deleted file mode 100644
index 18b5e4c..0000000
--- a/utils/C2.txt
+++ /dev/null
@@ -1 +0,0 @@
-Add C2.txt on master
[root@cscs-100-116-20-141 my_project]# tree
.
├── help.txt -> README
├── init.txt
├── README
└── utils
    └── C1.txt

1 directory, 4 files
[root@cscs-100-116-20-141 my_project]# git checkout -- utils/C2.txt
[root@cscs-100-116-20-141 my_project]# git status
# On branch master
nothing to commit, working directory clean
[root@cscs-100-116-20-141 my_project]# tree
.
├── help.txt -> README
├── init.txt
├── README
└── utils
    ├── C1.txt
    └── C2.txt

1 directory, 5 files
2.4 几乎所有操作都是本地执行
在 Git 中的绝大多数操作都只需要访问 本地 文件和资源,一般不需要依赖 网络 上其它计算机数据(也没有集中式版本控制系统的网络延时开销)。因为在本地磁盘上就有项目的完整历史,所以大部分操作看起来瞬间完成
你可以在 离线 时正常修改文件并提交到 本地库,完全不需要考虑 远程库 的存在。可以直接从本地数据库中读取项目历史,查看当前版本与其它版本之间引入的修改差异等
2.5 分支和标签只是引用而已
由于 Git 的分支和标签本质上都只是包含所指提交对象的 SHA-1 哈希值的文件而已,所以创建和删除都非常快!
(1) branch
分支(branch) 本质上仅仅是指向 提交对象(commit object) 的可变指针!Git 的默认分支名字是 master,分支会在每次提交时自动向前移动
Git 是怎么知道当前在哪一个分支上呢?很简单,它有一个名为 HEAD(头指针) 的特殊指针,默认情况下指向它当前所在的本地分支,并指向最近一次提交记录,比如 HEAD -> master -> <commit>,可以 cat .git/HEAD 查看
几乎所有版本控制系统都以某种形式支持分支功能,但是只有 Git 能以难以置信的轻量方式(创建新分支这一操作几乎能在瞬间完成,并且在不同分支之间的切换操作也是一样便捷)处理分支,而其它版本控制系统它们在创建分支时,常常需要将所有的项目文件都复制一遍,并保存到一个特定的目录(这个过程对大项目来说会很耗时)。也正因为这一特性,使得 Git 从众多版本控制系统中脱颖而出
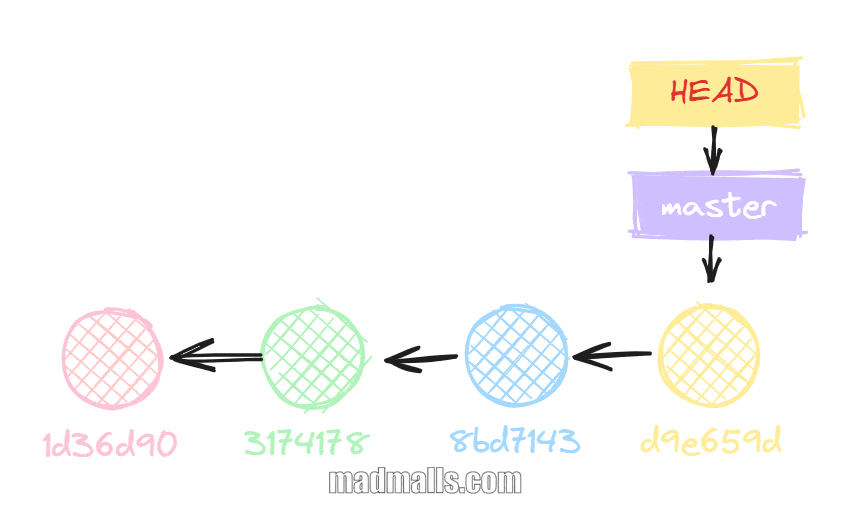
[root@cscs-100-116-20-141 my_project]# git log --all --graph --pretty=oneline --abbrev-commit --decorate=short
* d9e659d (HEAD, master) renamed: README -> README.md; rebuild soft link help.txt
* 8bd7143 (develop) Add C2.txt
* 3174178 (bugFix2, bugFix) Add C1.txt; modify README
* 1d36d90 init repo

# 基于当前提交(HEAD)创建新分支 bugFix
[root@cscs-100-116-20-141 my_project]# git branch bugFix
[root@cscs-100-116-20-141 my_project]# cat .git/refs/heads/bugFix
d9e659d57412b222bcaf69561732481e5854867a

# 基于指定提交(3174178)创建新分支 bugFix2
[root@cscs-100-116-20-141 my_project]# git branch bugFix2 3174178
[root@cscs-100-116-20-141 my_project]# cat .git/refs/heads/bugFix2
317417804b8f469cff56e551abf5ec658c1f28b8

# 基于指定分支(master)创建新分支 bugFix3
[root@cscs-100-116-20-141 my_project]# git branch bugFix3 master
[root@cscs-100-116-20-141 my_project]# cat .git/refs/heads/bugFix3
d9e659d57412b222bcaf69561732481e5854867a

# 基于当前提交(HEAD)创建新分支 develop 并检出(切换到新分支)
# 注意: 分支切换会改变你工作目录中的文件。在切换分支时,一定要注意你工作目录里的文件会被改变。如果是切换到一个较旧的分支,你的工作目录会恢复到该分支最后一次提交时的样子。如果 Git 不能干净利落地完成这个任务,它将禁止切换分支
[root@cscs-100-116-20-141 my_project]# git checkout -b develop
Switched to a new branch 'develop'
[root@cscs-100-116-20-141 my_project]# cat .git/refs/heads/develop
d9e659d57412b222bcaf69561732481e5854867a

# 查看所有分支
[root@cscs-100-116-20-141 my_project]# git branch -av
  bugFix  d9e659d renamed: README -> README.md; rebuild soft link help.txt
  bugFix2 3174178 Add C1.txt; modify README
  bugFix3 d9e659d renamed: README -> README.md; rebuild soft link help.txt
* develop d9e659d renamed: README -> README.md; rebuild soft link help.txt
  master  d9e659d renamed: README -> README.md; rebuild soft link help.txt
我们切换到 bugFix2 分支上,修改文件并提交一次,bugFix2 现在指向新的提交节点:
[root@cscs-100-116-20-141 my_project]# git checkout bugFix2
Switched to branch 'bugFix2'
[root@cscs-100-116-20-141 my_project]# echo "123" >> utils/C1.txt
[root@cscs-100-116-20-141 my_project]# git add utils/C1.txt
[root@cscs-100-116-20-141 my_project]# git commit -m "bug fix 02"
[bugFix2 6c586a3] bug fix 02
 1 file changed, 1 insertion(+)
[root@cscs-100-116-20-141 my_project]# git log --all --graph --pretty=oneline --abbrev-commit --decorate=short
* 6c586a3 (HEAD, bugFix2) bug fix 02
| * d9e659d (master, develop, bugFix3, bugFix) renamed: README -> README.md; rebuild soft link help.t
| * 8bd7143 Add C2.txt
|/
* 3174178 Add C1.txt; modify README
* 1d36d90 init repo
[root@cscs-100-116-20-141 my_project]# cat .git/refs/heads/bugFix2
6c586a3fb91757849faef4a8d33f7ec77fd1602c
(2) tag
因为分支很容易被改变(当有新的提交时它会移动;也可以被人为移动),大部分分支只是临时的,并且还一直在变。如果你需要永久指向某个提交记录的引用,就要使用 标签(tag) 了,它是静态的,不会随着新的提交而移动(除非你先删除标签、再基于其它提交创建同名标签,否则它是不会变的),通常用于标记项目的里程碑或者版本
# 列出所有标签
git tag
git tag --list
# 按照通配符列出标签需要 -l 或 --list 选项
git tag --list "v1.8.5*"

# 创建轻量(lightweight)标签: Git 不会创建 tag object,而是直接指向一个 commit object
[root@cscs-100-116-20-141 my_project]# git tag v1.0.0
[root@cscs-100-116-20-141 my_project]# git tag v1.0.1 8bd7143
[root@cscs-100-116-20-141 my_project]# git tag v1.0.2 bugFix2
[root@cscs-100-116-20-141 my_project]# git log --all --graph --pretty=oneline --abbrev-commit --decorate=short
* 6c586a3 (tag: v1.0.2, bugFix2) bug fix 02
| * d9e659d (HEAD, tag: v1.0.0, master, develop, bugFix3, bugFix)
| * 8bd7143 (tag: v1.0.1) Add C2.txt
|/
* 3174178 Add C1.txt; modify README
* 1d36d90 init repo
[root@cscs-100-116-20-141 my_project]# git cat-file -t v1.0.0
commit
[root@cscs-100-116-20-141 my_project]# cat .git/refs/tags/v1.0.0
d9e659d57412b222bcaf69561732481e5854867a

# 创建附注(annotated)标签: Git 会创建 tag object(.git/objects/74/2e160692112d13d7d84ba24bdaefd4ed45421e),它里面包含指向的 commit object 和打标签者的名字、电子邮件地址、日期时间等信息
# 通常建议创建附注标签(指定 -a 选项),这样你可以拥有以上所有信息。但是如果你只是想用一个临时的标签,或者因为某些原因不想要保存这些信息,那么也可以用轻量标签
[root@cscs-100-116-20-141 my_project]# git tag -a v2.0.0 -m "Release version 2.0.0"
[root@cscs-100-116-20-141 my_project]# cat .git/refs/tags/v2.0.0
742e160692112d13d7d84ba24bdaefd4ed45421e
[root@cscs-100-116-20-141 my_project]# git cat-file -t v2.0.0
tag
[root@cscs-100-116-20-141 my_project]# git cat-file -p v2.0.0
object d9e659d57412b222bcaf69561732481e5854867a
type commit
tag v2.0.0
tagger Madman <Madman@163.com> 1705734777 +0800

Release version 2.0.0
[root@cscs-100-116-20-141 my_project]# git log --all --graph --pretty=oneline --abbrev-commit --decorate=short
* 6c586a3 (tag: v1.0.2, bugFix2) bug fix 02
| * d9e659d (HEAD, tag: v2.0.0, tag: v1.0.0, master, develop, bug
| * 8bd7143 (tag: v1.0.1) Add C2.txt
|/
* 3174178 Add C1.txt; modify README
* 1d36d90 init repo

# 查看标签信息
git show v1.0.0

# 删除本地标签
git tag -d v1.0.0
(3) 分离的 HEAD
分离的 HEAD(detached HEAD) 就是让其指向了某个具体的提交记录而不是分支名。执行 git checkout 8bd7143 后,HEAD 指向 8bd7143、master 还是指向 d9e659d
[root@cscs-100-116-20-141 my_project]# git log --all --graph --pretty=oneline --abbrev-commit --decorate=short
* d9e659d (HEAD, master) renamed: README -> README.md; rebuild soft link help.txt
* 8bd7143 Add C2.txt
* 3174178 Add C1.txt; modify README
* 1d36d90 init repo
[root@cscs-100-116-20-141 my_project]# tree
.
├── help.txt -> README.md
├── init.txt
├── README.md
└── utils
    ├── C1.txt
    └── C2.txt

1 directory, 5 files
[root@cscs-100-116-20-141 my_project]# git checkout 8bd7143
Note: checking out '8bd7143'.

You are in 'detached HEAD' state. You can look around, make experimental
changes and commit them, and you can discard any commits you make in this
state without impacting any branches by performing another checkout.

If you want to create a new branch to retain commits you create, you may
do so (now or later) by using -b with the checkout command again. Example:

  git checkout -b new_branch_name

HEAD is now at 8bd7143... Add C2.txt
[root@cscs-100-116-20-141 my_project]# tree
.
├── help.txt -> README
├── init.txt
├── README
└── utils
    ├── C1.txt
    └── C2.txt

1 directory, 5 files
[root@cscs-100-116-20-141 my_project]# git log --all --graph --pretty=oneline --abbrev-commit --decorate=short
* d9e659d (master) renamed: README -> README.md; rebuild soft link help.txt
* 8bd7143 (HEAD) Add C2.txt
* 3174178 Add C1.txt; modify README
* 1d36d90 init repo
注意: 如果你在分离了 HEAD 的情况下又提交了新节点(14b8501),那么你应该为此创建新分支,否则切换到其它分支后会看不到这个新提交节点(切换时 Git 会提醒你,后续也可以用
git reflog查看)
[root@cscs-100-116-20-141 my_project]# echo "Add C3.txt in 'detached HEAD' state, current commit id is 8bd7143" > utils/C3.txt
[root@cscs-100-116-20-141 my_project]# git add utils/C3.txt
[root@cscs-100-116-20-141 my_project]# git commit -m "Add C3.txt"
[detached HEAD 14b8501] Add C3.txt
 1 file changed, 1 insertion(+)
 create mode 100644 utils/C3.txt
[root@cscs-100-116-20-141 my_project]# git log --all --graph --pretty=oneline --abbrev-commit --decorate=short
* 14b8501 (HEAD) Add C3.txt
| * 6c586a3 (bugFix2) bug fix 02
| | * d9e659d (master, develop, bugFix3, bugFix) renamed: README -> README.md; rebuild soft link help.txt
| |/
|/|
* | 8bd7143 Add C2.txt
|/
* 3174178 Add C1.txt; modify README
* 1d36d90 init repo
[root@cscs-100-116-20-141 my_project]# git checkout master
Warning: you are leaving 1 commit behind, not connected to
any of your branches:

  14b8501 Add C3.txt

If you want to keep them by creating a new branch, this may be a good time
to do so with:

 git branch new_branch_name 14b8501

Switched to branch 'master'

# 此时查看历史会隐藏 14b8501 提交
[root@cscs-100-116-20-141 my_project]# git log --all --graph --pretty=oneline --abbrev-commit --decorate=short
* 6c586a3 (bugFix2) bug fix 02
| * d9e659d (HEAD, master, develop, bugFix3, bugFix) renamed: README -> README.md; rebuild soft link help.txt
| * 8bd7143 Add C2.txt
|/
* 3174178 Add C1.txt; modify README
* 1d36d90 init repo
(4) 相对引用
相对引用非常给力,这里我介绍两个简单的用法:
- 使用
^向后移动 1 个提交记录,比如master^相当于 master 分支最新提交节点的父提交、master^^相当于 master 分支最新提交节点的祖父提交 - 使用
~<num>向后移动 num 个提交记录,如~3;即HEAD^等价于HEAD~1等价于HEAD~
# 可以执行多次,连续在当前分支上后退
git checkout HEAD^

# 一次性在当前分支上后退 3 步
git checkout HEAD~3

# 如果当前在 master 分支,要切换到 bugFix 的父提交
git checkout bugFix^
可以使用相对引用来 移动分支,比如使用 -f 选项让分支指向另一个提交:
# 假设当前不在 bugFix 分支上;将 bugFix 分支强制指向 HEAD 的祖父提交
git branch -f bugFix HEAD~2

# 假设当前不在 bugFix 分支上;将 bugFix 分支强制指向 3174178 这个提交
git branch -f bugFix 3174178
推荐:


0 条评论
评论者的用户名
评论时间暂时还没有评论.