
Kubernetes 容器编排|第1章:使用 kubeadm 部署 K8s 集群
Synopsis: 如果手动安装 Kubernetes 服务端和客户端的各组件会非常复杂,尤其是初学者尚不清楚 K8s 的架构情况下很容易部署失败,从而打击继续学习的积极性。当然,如果你只是想体验一下 K8s 的特性,可以使用官方入门教程 https://kubernetes.io/docs/tutorials/kubernetes-basics/ 中那样单台虚拟机上运行 Minikube 即可。或者,使用 Ansible role (https://galaxy.ansible.com/geerlingguy/kubernetes) 来自动部署,但是如果你想深入掌握 K8s 各组件的作用,建议使用官方提供的管理工具 kubeadm 来部署 K8s 集群
1. 前提条件
我们准备部署包含 3 个节点的 Kubernetes 集群:
| 节点角色 | 主机名 | 节点网络 |
|---|---|---|
| Master | master | 192.168.40.121 |
| Nodes | node1 | 192.168.40.122 |
| Nodes | node2 | 192.168.40.123 |
每个节点至少需要
2 核以上 CPU、2 GB以上内存,且需要关闭swap
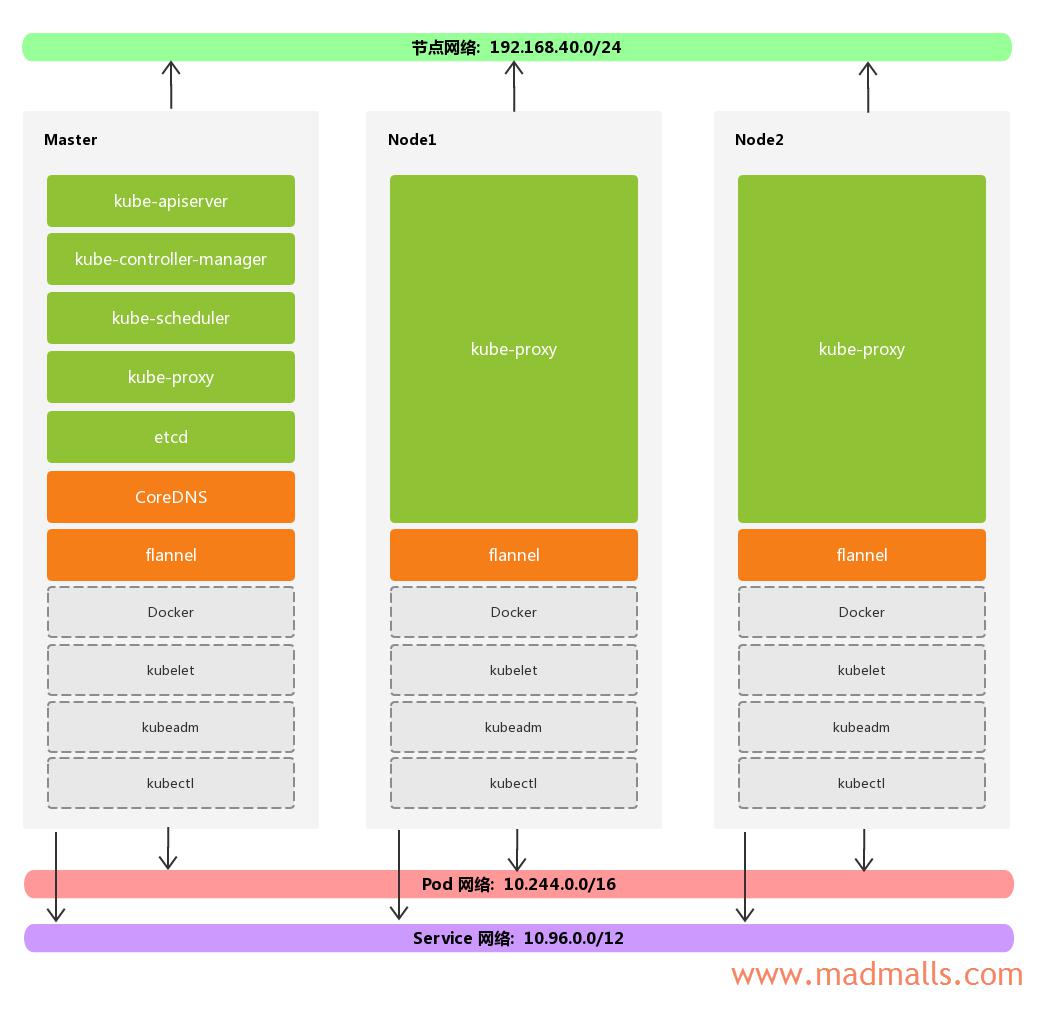
Pod 网络为 10.244.0.0/16,因为这是 flannel 默认使用的网络,所以我们也将 Pod 网络指定为这个子网
Service 网络为 10.96.0.0/12,注意网络掩码为 12 位
如果用 kubeadm 来部署 K8s 集群的话,每个节点都需要安装 Docker(或者你也可以使用 rkt 容器引擎)、kubelet、kubeadm,而且上图中绿色的组件都启动为 static Pods,橙色的组件为添加的 插件(Addons)
1.1 主机名解析
Master 节点除了可以通过 IP 连接 Nodes 各节点以外,还能通过 Nodes 各节点的主机名通信。修改 Master 节点上的 /etc/hosts 文件(或者通过 DNS 解析)
[root@master ~]# cat /etc/hosts
127.0.0.1   localhost localhost.localdomain localhost4 localhost4.localdomain4
::1         localhost localhost.localdomain localhost6 localhost6.localdomain6

192.168.40.121 master
192.168.40.122 node1
192.168.40.123 node2
1.2 SSH 密钥登录
在 Master 节点上生成 SSH 密钥对,并将公钥分发给 Nodes 各节点,从而实现 Master 节点能够通过 SSH 免密码登录 Nodes 各节点
1. Master 节点生成 SSH 密钥对
[root@master ~]# ssh-keygen

2. 将公钥分发给 Nodes 各节点
[root@master ~]# ssh-copy-id root@node1
[root@master ~]# ssh-copy-id root@node2

3. 验证
[root@master ~]# ssh node1
[root@node1 ~]# exit

[root@master ~]# ssh node2
[root@node2 ~]# exit
1.3 时间同步
Master 节点配置为 NTP 服务器,允许 Nodes 各节点与它进行时间同步
首先,所有节点都安装 ntp 软件包:
然后,修改 Master 节点上的 NTP 配置文件:
[root@master ~]# cat /etc/ntp.conf
# 指定上层NTP服务器
server 0.cn.pool.ntp.org iburst
server 1.cn.pool.ntp.org iburst
server 2.cn.pool.ntp.org iburst
server 3.cn.pool.ntp.org iburst

# local clock
server 127.127.1.0
fudge  127.127.1.0 stratum 10

# 控制客户端的访问
restrict default nomodify notrap nopeer noquery

restrict 127.0.0.1
restrict ::1

# 指定 driftfile  和 logfile
driftfile /var/lib/ntp/drift
logfile /var/log/ntp.log

# 其它配置项
includefile /etc/ntp/crypto/pw
keys /etc/ntp/keys
disable monitor
启动 Master 节点上的 NTP 服务前,可以先手动与上层 NTP 服务器同步一次时间:
启动 Master 节点上的 NTP 服务,并设置开机启动:
最后,修改 Nodes 各节点上的 NTP 配置文件 /etc/ntp.conf,只需要将默认的 server *.centos.pool.ntp.org iburst 删除掉,并指定上层 NTP 服务器为 Master 节点的 IP 即可:
# Use public servers from the pool.ntp.org project.
# Please consider joining the pool (http://www.pool.ntp.org/join.html).
# server 0.centos.pool.ntp.org iburst
# server 1.centos.pool.ntp.org iburst
# server 2.centos.pool.ntp.org iburst
# server 3.centos.pool.ntp.org iburst
server 192.168.40.121 iburst
Nodes 各节点需要先手动与 Master 节点同步一次时间,然后再启动 NTP 服务,并设置开机启动:
NTP配置详情可参考: https://madmalls.com/blog/post/build-ntp-in-centos7/#4-ntp-suite
1.4 禁用防火墙
由于后续 kube-proxy 组件需要借助 iptables 或 ipvs 来构建 Kubernetes 的核心资源之一的 Service 资源对象,所以需要在所有节点上先禁用 iptables 或 firewalld:
# systemctl stop firewalld
# systemctl disable firewalld

# iptables -F && iptables -t nat -F && iptables -t mangle -F && iptables -X
# systemctl stop iptables
# systemctl disable iptables
另外,Kubernetes 网络还需要开启相关内核参数:
1. 加载内核模块
# modprobe overlay
# modprobe br_netfilter

2. 调整内核参数
# cat > /etc/sysctl.d/99-kubernetes-cri.conf << EOF
net.bridge.bridge-nf-call-iptables  = 1
net.bridge.bridge-nf-call-ip6tables = 1
net.ipv4.ip_forward                 = 1
EOF

# sysctl --system
验证 net.bridge.bridge-nf-call-iptables 和 net.bridge.bridge-nf-call-ip6tables 的值是否为 1:
[root@master ~]# cat /proc/sys/net/bridge/bridge-nf-call-iptables
1
[root@master ~]# cat /proc/sys/net/bridge/bridge-nf-call-ip6tables
1
1.5 禁用 SELinux
所有节点都需要禁用 SElinux
2. 提供 Container runtimes
https://kubernetes.io/docs/setup/production-environment/container-runtimes/
2.1 安装 Docker-CE
如果你使用 Docker 来作为 Kubernetes 的 容器运行时(Container runtimes),当前 Kubernetes v1.15.1 建议我们使用 Docker 18.06.2 版本。在每个节点上执行:
1. 添加 docker-ce YUM 源
# yum-config-manager --add-repo http://mirrors.aliyun.com/docker-ce/linux/centos/docker-ce.repo

2. 安装必要的一些系统工具
# yum makecache fast
# yum -y install yum-utils device-mapper-persistent-data lvm2

3. 列出 Docker-CE 所有可选的版本
# yum --showduplicates list docker-ce

4. 安装 Docker-CE 18.06.2 版本
# yum -y install docker-ce-18.06.2.ce
2.2 设置 Docker daemon
官方文档建议将 Docker 的 cgroup driver 修改为
systemd,但是我后续执行kubeadm init初始化 Master 节点时会失败,原因未知,所以这里维持默认的cgroupfs
# mkdir /etc/docker
# cat > /etc/docker/daemon.json << EOF
{
  "bip": "172.31.0.1/16",
  "registry-mirrors": [
    "https://registry.docker-cn.com"
  ]
}
EOF
说明: Docker 默认使用的
docker0网段是172.17.0.0/16,如果你的局域网内部已经有该网段了,请先在/etc/docker/daemon.json中指定新的bip之后再启动 Docker 服务,否则 SSH 会被断开
启动 Docker 服务,并设置开机启动:
3. 配置 K8s YUM 源
在每个节点上执行:
分类: Kubernetes
标签: CoreDNS etcd flannel kube-apiserver kube-controller-manager kube-proxy kube-scheduler kubeadm kubectl kubelet Kubernetes Minikube k8s Docker


分享
作者
发表评论
专题系列


1 条评论
评论者的用户名
评论时间jason_vip
2020-08-18T02:33:40Z作者,k8S这个能更新快点吗,想要多学习学习