
Python 3 爬虫|第8章:使用 asyncio 模块实现并发

Synopsis: asyncio 模块于 Python 3.4 添加到标准库中,它在单线程中使用事件循环来驱动协程从而实现并发。对事件循环来说,调用回调与在暂停的协程上调用 .send() 方法效果差不多。各个暂停的协程是要消耗内存,但是比线程消耗的内存数量级小。而且,协程能避免可怕的 "回调地狱"。使用 asyncio 包时,我们编写的协程被包装成 Task 对象(相当于调用方),并且在我们编写的协程中,会通过调用 await 或 yield from 来使用由 asyncio 模块或第三方库(如 aiohttp)所提供的协程(即委派生成器),而生成器最终把职责委托给 Future 对象,这种处理方式相当于架起了管道,让 asyncio 事件循环(通过我们编写的协程)驱动执行低层异步 I/O 操作的库函数
代码已上传到 https://github.com/wangy8961/python3-concurrency ,欢迎 star
1. asyncio概述
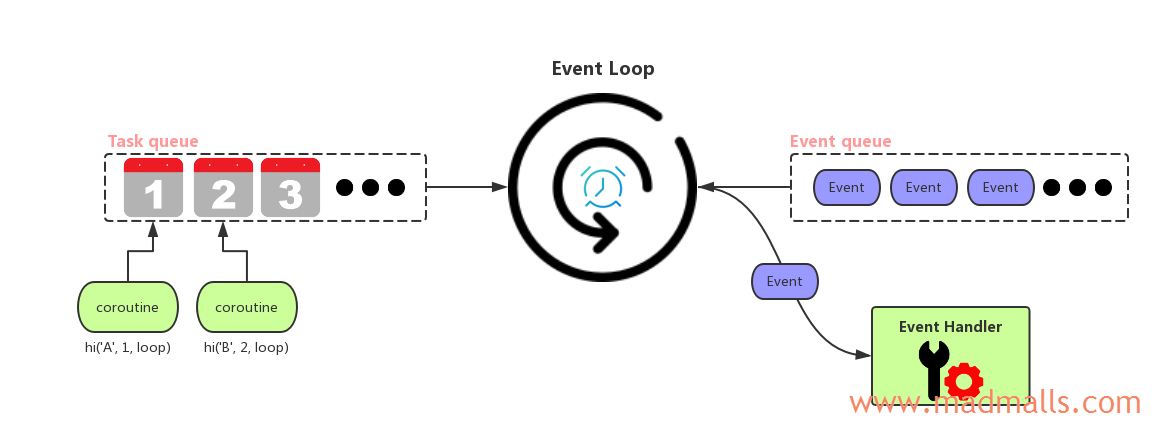
Python 3.4 的标准库中添加了 asyncio 模块,它在 单线程 中使用 事件循环(event loop) 来驱动 协程(coroutines) 从而实现 并发(concurrency)。此模块的主要组件和概念包括:
Event Loop: 每个线程中只能有一个事件循环,每次只能运行一个任务(Task)。事件循环会不断地重复 "监听事件发生 -- 处理该事件" 这一过程。当Task A在等待Future对象运行完成时,会把控制权交还给事件循环(通过yield关键字),这样事件循环就可以运行Task B。一段时间后,Task A所等待的Future对象完成了,事件循环会唤醒Task A继续运行,从而实现并发Coroutines: 协程可以在执行期间暂停(suspend),这样就可以在等待外部的处理(例如,等待网络 I/O 数据)完成之后,从之前暂停的地方恢复执行(resume)Futures:Future对象是一个"占位符",用来保存尚未完成的操作的结果(或异常)。在asyncio模块中,所有需要异步完成的操作都对应一个Future对象,当操作完成时,将数据设置为Future对象的结果。Python 3.4 时实现了__iter__方法,可以在协程中使用yield from future等待Future对象的返回值; Python 3.5+ 实现了__await__方法,可以在协程中使用await future或yield from future(有一行代码:__iter__ = __await__)等待Future对象的返回值Tasks:Task类是Future的子类,用来包装 我们写的协程,当事件循环启动后,Task会自动调用result = coro.send(None)驱动协程的运行,相当于 http://www.madmalls.com/blog/post/coroutine-in-python/#16-yield-from 中的调用方,而Future相当于end-point(sink),Future的__await__方法中的yield self会直接将Future对象本身传递给Task中的result,并把控制权交还给事件循环。同时,Task会向事件循环注册事件: 当Future对象完成时,请执行我的__wakeup()方法唤醒我。所以,当Future对象结束时,Task被唤醒,再次执行coro.send(None),最终获取到Future对象的结果(可能被协程链中的其它协程处理过),并设置为Task的结果,详情见章节 5 的总结
由于 asyncio 模块使用 单线程,任何阻塞操作都会阻塞整个 事件循环,所以任何 阻塞型操作 都要换成 非阻塞型的异步操作。标准库中的 socket 模块,所有的方法比如 socket.accept() 和 socket.recv() 等都是是 阻塞型操作,所以要换成 非阻塞型的异步操作 比如 loop.sock_accept() 和 loop.sock_recv() 等。同时,asyncio 模块的 事件循环 基于 Python 3.4 中新增的 selectors 模块,使用操作系统底层提供的 I/O multiplexing 来同时监听多个 socket 上的 可读/可写 事件,从而实现了 异步网络 I/O
2. Event Loop
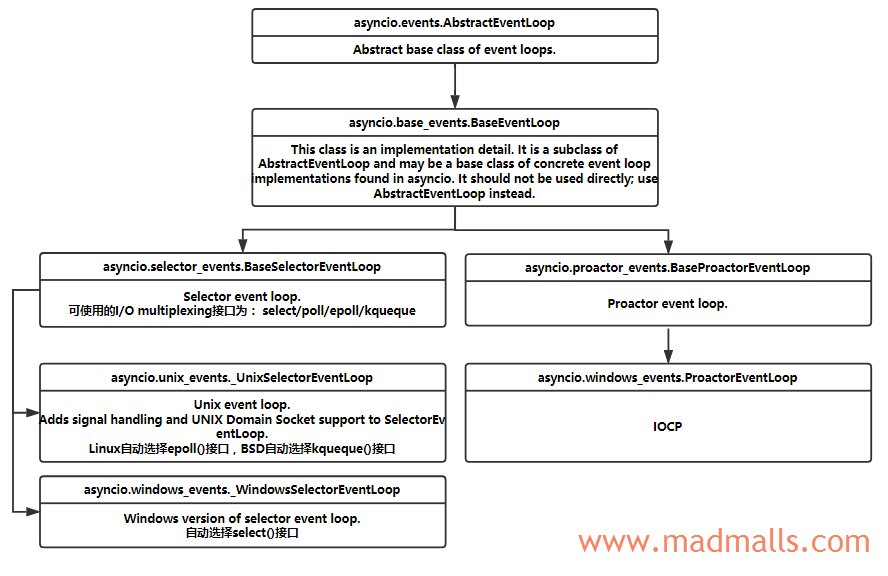
asyncio 实现了两种 事件循环 对象:
asyncio.SelectorEventLoop: (默认使用)基于 Python 3.4 中添加的selectors模块,它会根据 OS 自动选择最优的I/O multiplexing接口,比如在 Linux 中会使用epoll,在 BSD 中使用Kqueueasyncio.ProactorEventLoop: 只能用于 Windows 系统,使用IOCP(I/O Completion Ports),参考 MSDN documentation on I/O Completion Ports
2.1 获取事件循环
使用 asyncio.get_event_loop() 获取当前的 事件循环:
# For Linux
In [1]: import asyncio

In [2]: loop = asyncio.get_event_loop()

In [3]: loop
Out[3]: <_UnixSelectorEventLoop running=False closed=False debug=False>
# For Windows
In [1]: import asyncio

In [2]: loop = asyncio.get_event_loop()

In [3]: loop
Out[3]: <_WindowsSelectorEventLoop running=False closed=False debug=False>
2.2 设置事件循环
使用 asyncio.set_event_loop(loop) 设置 事件循环,Windows 中默认使用 asyncio.windows_events._WindowsSelectorEventLoop,只支持 sockets,不支持 Pipes 和 subprocesses,我们可以更换为 asyncio.windows_events.ProactorEventLoop,更详细的区别参考: https://docs.python.org/3/library/asyncio-eventloops.html#windows
In [1]: import sys

In [2]: import asyncio

In [3]: asyncio.get_event_loop()
Out[3]: <_WindowsSelectorEventLoop running=False closed=False debug=False>

In [4]: if sys.platform == 'win32':
   ...:     loop = asyncio.ProactorEventLoop()
   ...:     asyncio.set_event_loop(loop)
   ...:

In [5]: asyncio.get_event_loop()
Out[5]: <ProactorEventLoop running=False closed=False debug=False>
设置
asyncio.SelectorEventLoop使用的I/O multiplexing接口:
在 Mac OS 10.6、10.7 和 10.8 中,默认的事件循环是 asyncio.SelectorEventLoop,它会自动选择 selectors.KqueueSelector,使用操作系统底层提供的 Kquque 接口实现 I/O multiplexing,但是它不支持字符设备,可以更换为 selectors.SelectSelector():
import asyncio
import selectors

selector = selectors.SelectSelector()
loop = asyncio.SelectorEventLoop(selector)
asyncio.set_event_loop(loop)
2.3 管理事件循环策略
asyncio.get_event_loop_policy(): 获取当前事件循环策略。Get the current event loop policy.asyncio.set_event_loop_policy(policy): 更换事件循环策略。Set the current event loop policy. If policy is None, the default policy is restored.
可以替换 asyncio 中默认的事件循环策略,比如使用 uvloop,它用 Cython 编写,基于 libuv。uvloop 可以让 asyncio 更快,测试表明比 tornado、curio、gevent 等快 两倍,几乎接近于 Go 程序的速度
(1) 安装 uvloop
(2) 使用 uvloop.EventLoopPolicy()
In [1]: import asyncio

In [2]: import uvloop

In [3]: asyncio.set_event_loop_policy(uvloop.EventLoopPolicy())

In [4]: asyncio.get_event_loop()
Out[4]: <uvloop.Loop running=False closed=False debug=False>
2.4 运行事件循环
事件循环需要启动才会不断循环监视事件并处理事件,常用方法:
AbstractEventLoop.run_until_complete(future): 运行事件循环,直到传入的asyncio.Future对象完成(如果传入协程,首先会自动将协程包装成 Task 对象,后面会细讲),返回Future对象的结果或抛出异常AbstractEventLoop.run_forever(): 一直运行事件循环,直到调用AbstractEventLoop.stop()后才会停止AbstractEventLoop.stop(): 停止正在运行的事件循环AbstractEventLoop.close(): 关闭事件循环,The loop must not be running. Pending callbacks will be lost. This clears the queues and shuts down the executor, but does not wait for the executor to finish. 一旦关闭了事件循环后,就不能再调用run_until_complete等方法
2.5 基于内部时钟调度 callback
asyncio 的默认事件循环中有一个内部时钟,不同于 time.time(),可以用 AbstractEventLoop.time() 获取当前的内部时间
(1) call_soon - 立即调用
运行 AbstractEventLoop.call_soon(callback, *args, context=None) 方法后,会立即将 callback 回调函数注册到事件循环上,如果其它地方也执行了 call_soon() 函数,将按照类似 FIFO 队列的方式依次执行对应的 callback,当 callback 执行完成后,控制权交还给事件循环
call_soon() 返回 asyncio.events.Handle 对象,可以调用该对象的 cancel() 方法取消执行 callback
import time
import asyncio

def hello_world(loop):
    print('When calling hello_world in event loop is: {}'.format(loop.time()))
    print('Hello World')
    loop.stop()

loop = asyncio.get_event_loop()
print('The current time of time.time() is {}'.format(time.time()))
print('The current time in event loop is: {}'.format(loop.time()))

# Arrange for a callback to be called as soon as possible.
h = loop.call_soon(hello_world, loop)
print(type(h))
print(h)

# Blocking call interrupted by loop.stop()
loop.run_forever()
loop.close()


# Output:
The current time of time.time() is 1533901306.6052473
The current time in event loop is: 3821.5
<class 'asyncio.events.Handle'>
<Handle hello_world(<_WindowsSele...e debug=False>) at d:/python-code/test_asyncio.py:4>
When calling hello_world in event loop is: 3821.5
Hello World
call_soon() 不是线程安全的,call_soon_threadsafe() 方法跟 call_soon 功能类似,只不过它是线程安全的
(2) call_later - 延迟调用
运行 AbstractEventLoop.call_later(delay, callback, *args, context=None) 方法后,将在 delay 秒后执行 callback
call_later() 返回 asyncio.events.TimeHandle 对象,可以调用该对象的 cancel() 方法取消执行 callback
import time
import asyncio

def hello_world(loop):
    print('When calling hello_world in event loop is: {}'.format(loop.time()))
    print('Hello World')
    loop.stop()

loop = asyncio.get_event_loop()
print('The current time of time.time() is {}'.format(time.time()))
print('The current time in event loop is: {}'.format(loop.time()))

# Arrange for the callback to be called after the given delay seconds (either an int or float).
h = loop.call_later(1, hello_world, loop)
print(type(h))
print(h)

# Blocking call interrupted by loop.stop()
loop.run_forever()
loop.close()


# Output:
The current time of time.time() is 1533902066.982436
The current time in event loop is: 4581.875
<class 'asyncio.events.TimerHandle'>
<TimerHandle when=4582.875 hello_world(<_WindowsSele...e debug=False>) at d:/python-code/test_asyncio.py:4>
When calling hello_world in event loop is: 4582.875
Hello World
(3) call_at - 具体时刻调用
运行 AbstractEventLoop.call_at(when, callback, *args, context=None) 方法后,将在 when(可以是用 int 或 float 表示的 asyncio 内部时钟的 timestamp)指定的时刻执行 callback
call_at() 返回 asyncio.events.TimeHandle 对象,可以调用该对象的 cancel() 方法取消执行 callback
import time
import asyncio

def say_number(n, loop):
    print('Callback say_number output {} at {}'.format(n, loop.time()))

loop = asyncio.get_event_loop()
print('The current time of time.time() is {}'.format(time.time()))
print


2 条评论
评论者的用户名
评论时间v-dev
2022-07-03T07:40:07Z原来你这里的知识要付费呀
v-dev
2022-07-03T07:40:18Z散了散了