Flask Vue.js全栈开发|第22章:(番外篇) 用 Flask-RESTful 插件实现 API

Synopsis: 应多位读者的要求,终于在空闲时间写了 Flask-RESTful 插件实现 API。它其实是对 Flask MethodView 的再次封装,让用户能够更方便快捷地构建出 REST API,比如基于 HTTP 方法的调度、快速定义路由规则、支持对传入的参数值进行检验、可快速定制要返回的数据各字段值、资源方法可分别应用不同的装饰器(比如权限认证),默认返回 JSON 格式的数据(无需调用 jsonify 方法),当然也可以返回 HTML、XML、CSV 等格式的数据
1. 安装 Flask-RESTful
Flask-RESTful 插件可以快速构建 REST API,让我们先安装此插件:
(venv) D:\python-code\flask-vuejs-madblog\back-end> pip install flask-restful
(venv) D:\python-code\flask-vuejs-madblog\back-end> pip freeze > requirements.txt
2. 初始化插件
为了与之前的 API 区分开来,我们现在重新创建一个目录 back-end/app/api_v2,并新建空的 back-end/app/api_v2/__init__.py 文件,然后新建 back-end/app/api_v2/app.py:
from flask import Blueprint
from flask_restful import Api


# Blueprint
bp = Blueprint('api_v2', __name__)
# Init Flask-RESTful
api = Api(bp)
因为我们之前也是使用 蓝图(Blubprint) 的,所以新版本的 API 也注册一个蓝图,需要注意它的初始化方式是直接给 flask_restful.Api() 传入蓝图对象 bp,请参考: https://flask-restful.readthedocs.io/en/latest/intermediate-usage.html#use-with-blueprints
然后修改 back-end/app/__init__.py:
...
from app.api_v2.app import bp as api_v2_bp

...
def configure_blueprints(app):
    # 注册 blueprint
    app.register_blueprint(api_bp, url_prefix='/api')
    app.register_blueprint(api_v2_bp, url_prefix='/api/v2')
...
后续用
Flask-RESTful插件开发的第二版本 API 全部以/api/v2开头,比如http://127.0.0.1:5000/api/v2/ping
3. 创建第一个资源
Flask-RESTful 的核心概念就是 资源(Resources),其实它只是封装了 Flask MethodView,让你使用起来更方便,请参考: https://flask-restful.readthedocs.io/en/latest/quickstart.html#resourceful-routing 。我们可以看一下 flask_restful.Resource 的源码:
class Resource(MethodView):
    """
    Represents an abstract RESTful resource. Concrete resources should
    extend from this class and expose methods for each supported HTTP
    method. If a resource is invoked with an unsupported HTTP method,
    the API will return a response with status 405 Method Not Allowed.
    Otherwise the appropriate method is called and passed all arguments
    from the url rule used when adding the resource to an Api instance. See
    :meth:`~flask_restful.Api.add_resource` for details.
    """
    representations = None
    method_decorators = []

    def dispatch_request(self, *args, **kwargs):

        # Taken from flask
        #noinspection PyUnresolvedReferences
        meth = getattr(self, request.method.lower(), None)
        if meth is None and request.method == 'HEAD':
            meth = getattr(self, 'get', None)
        assert meth is not None, 'Unimplemented method %r' % request.method

        if isinstance(self.method_decorators, Mapping):
            decorators = self.method_decorators.get(request.method.lower(), [])
        else:
            decorators = self.method_decorators

        for decorator in decorators:
            meth = decorator(meth)

        resp = meth(*args, **kwargs)

        if isinstance(resp, ResponseBase):  # There may be a better way to test
            return resp

        representations = self.representations or OrderedDict()

        #noinspection PyUnresolvedReferences
        mediatype = request.accept_mimetypes.best_match(representations, default=None)
        if mediatype in representations:
            data, code, headers = unpack(resp)
            resp = representations[mediatype](data, code, headers)
            resp.headers['Content-Type'] = mediatype
            return resp

        return resp
根据 Flask-RESTful 最佳实践 的建议,我们将 资源 定义到 back-end/app/api_v2/resources/ 目录中,比如创建第一个测试资源 Ping-Pong,只需要新建 back-end/app/api_v2/resources/ping.py 文件:
注意:
back-end/app/api_v2/resources/是 Python 包,所以还需要创建一个空的back-end/app/api_v2/resources/__init__.py文件
然后,创建 back-end/app/api_v2/urls.py 文件并在其中导入 Ping 资源,最后注册路由:
from app.api_v2.app import api
from app.api_v2.resources.ping import Ping


# 统一注册路由
api.add_resource(Ping, '/', '/ping')
Endpoints:
我们使用 add_resource() 注册路由,一个资源可能会对应多个 URL,并且还能指定 endpoint,后续用 flask.url_for() 动态生成 URL:
1. 单个 URL
api.add_resource(Foo, '/foo')

2. 多个 URL
api.add_resource(Foo, '/foo1', '/foo2')

3. 同时指定 endpoint,默认是资源名的小写,比如 Foo 资源的 endpoint=foo
api.add_resource(Foo, '/foo1', '/foo2', endpoint='foo_ep')
最后,在 back-end/app/api_v2/app.py 文件末尾引入上面注册了路由的 urls.py 文件:
from flask import Blueprint
from flask_restful import Api


# Blueprint
bp = Blueprint('api_v2', __name__)
# Init Flask-RESTful
api = Api(bp)

# 统一注册路由
from app.api_v2 import urls
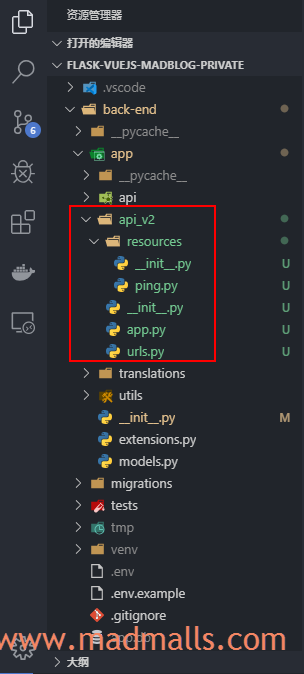
最终的目录结构如下:

此时,启动 Flask 应用:
(venv) D:\python-code\flask-vuejs-madblog\back-end> flask run
 * Serving Flask app "madblog.py" (lazy loading)
 * Environment: production
   WARNING: Do not use the development server in a production environment.
   Use a production WSGI server instead.
 * Debug mode: on
 * Restarting with stat
 * Debugger is active!
 * Debugger PIN: 968-712-707
 * Running on http://127.0.0.1:5000/ (Press CTRL+C to quit)
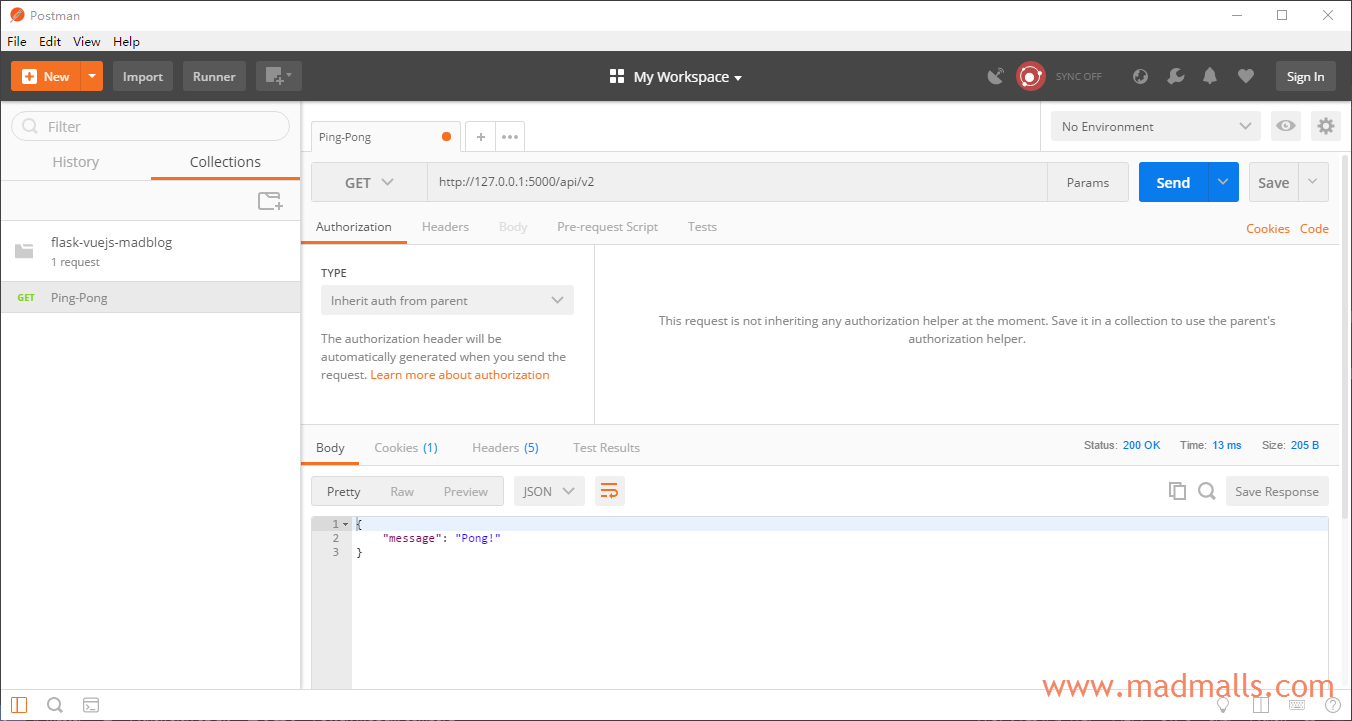
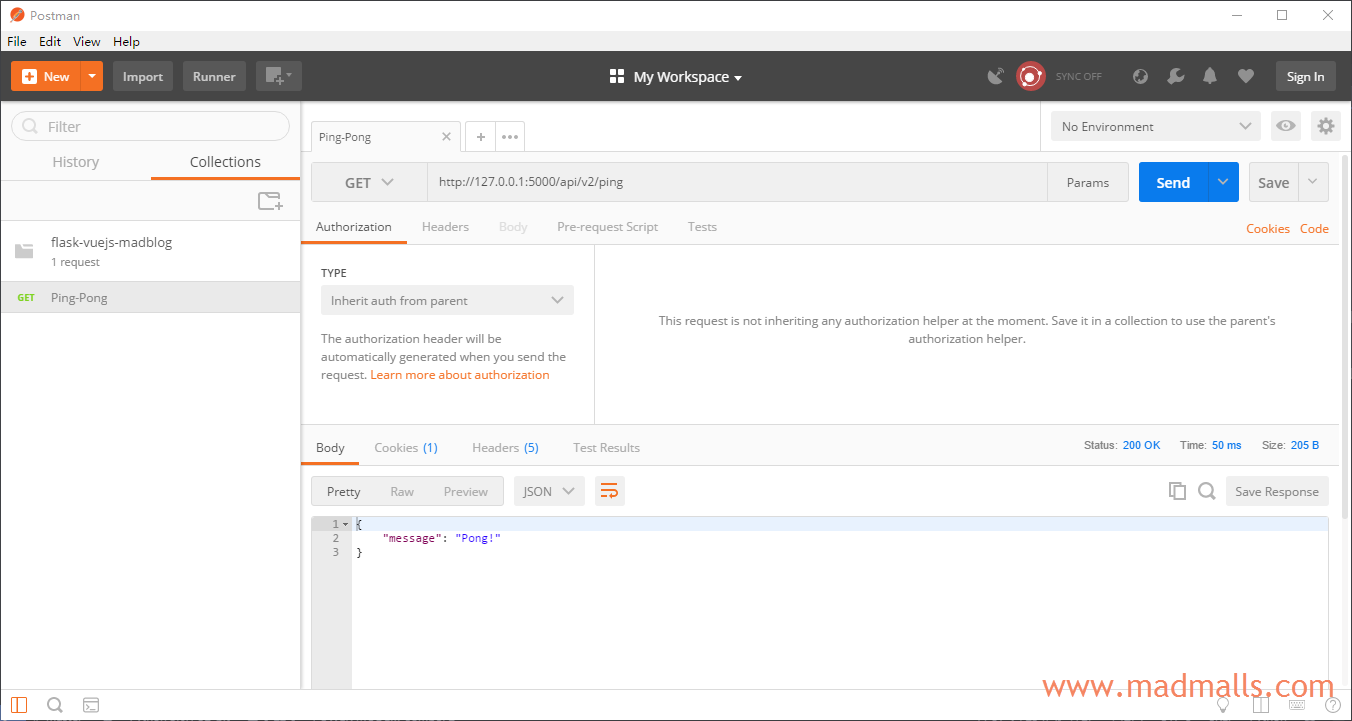
然后通过 Postman 访问 http://127.0.0.1:5000/api/v2 或者 http://127.0.0.1:5000/api/v2/ping 都能返回 Pong!:


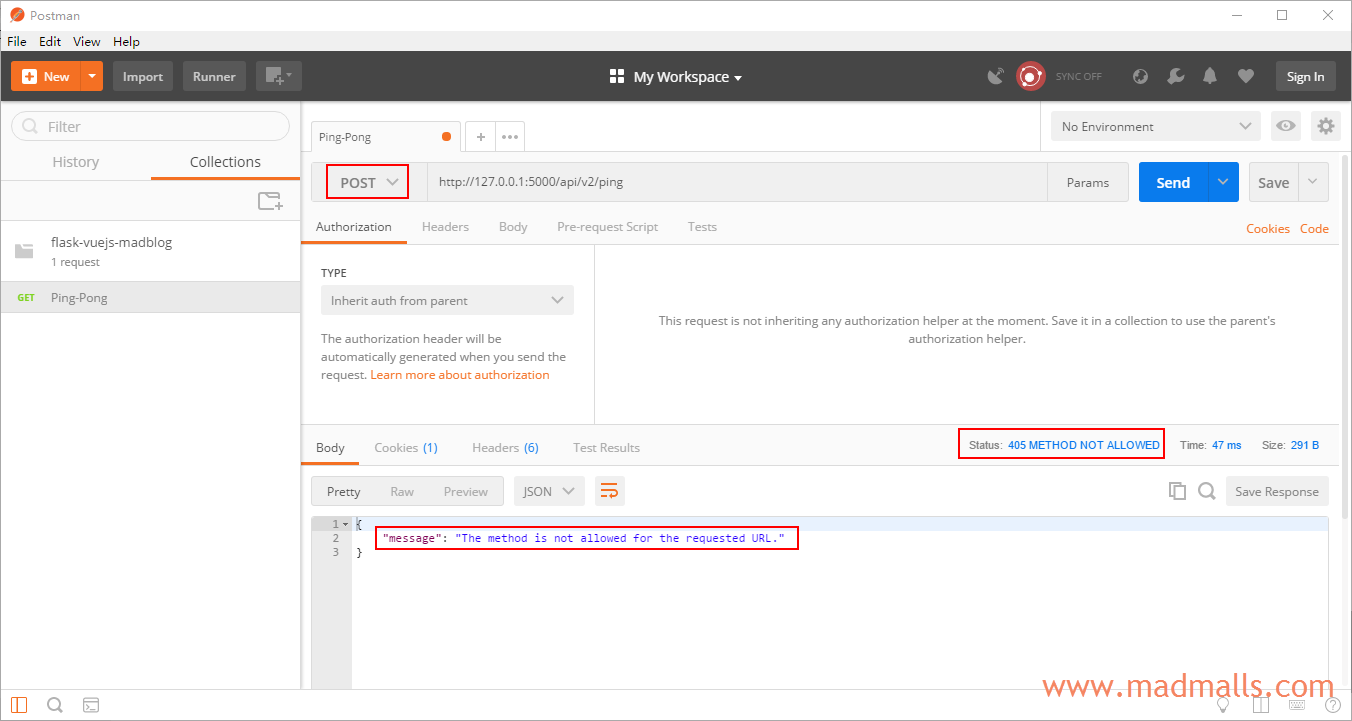
由于上述 Ping 资源没有实现 POST 方法,如果你使用 HTTP POST 动词时将返回 405 错误:

4. 重新设计 User API
类似于 Flask Vue.js全栈开发|第3章:Flask设计User用户相关API,新版本的 API 如下:
| HTTP方法 | 资源URL | 说明 |
|---|---|---|
GET |
/api/v2/users |
返回所有用户的集合 |
POST |
/api/v2/users |
注册一个新用户 |
GET |
/api/v2/users/<int:id> |
返回一个用户 |
PUT |
/api/v2/users/<int:id> |
修改一个用户 |
DELETE |
/api/v2/users/<int:id> |
删除一个用户 |
将包含两个 URL,分别是 http://127.0.0.1:5000/api/v2/users(用于用户列表)和 http://127.0.0.1:5000/api/v2/users/<int:id>(用于单个用户)。由于 Flask-RESTful 的 Resource 类只可以包装单个 URL,因此我们需要在 back-end/app/api_v2/resources/users.py 文件中实现两个资源:
from flask_restful import Resource


# User: shows a single user item and lets you delete a user item
class UserAPI(Resource):
    def get(self, id):
        pass

    def delete(self, id):
        pass

    def put(self, id):
        pass


# UserList: shows a list of all users, and lets you POST to add new user
class UserListAPI(Resource):
    def get(self):
        pass

    def post(self):
        pass
然后,修改 back-end/app/api_v2/urls.py 文件,添加新的路由规则:
...
from app.api_v2.resources.users import User, UserList

...
api.add_resource(UserListAPI, '/users', endpoint='users')
api.add_resource(UserAPI, '/users/<int:id>', endpoint='user')
现在只需要考虑各 HTTP 操作方法的具体实现即可
4.1 注册新用户
from flask import url_for
from flask_restful import Resource, reqparse, inputs
from app.extensions import db
from app.models import User


# UserList: shows a list of all users, and lets you POST to add new user
class UserListAPI(Resource):
    def __init__(self):
        self.parser = reqparse.RequestParser(bundle_errors=True)
        self.parser.add_argument('username', type=str, required=True, help='Please provide a valid username.', location='json')
        self.parser.add_argument('email', type=inputs.regex('^(([^<>()\[\]\\.,;:\s@"]+(\.[^<>()\[\]\\.,;:\s@"]+)*)|(".+"))@((\[[0-9]{1,3}\.[0-9]{1,3}\.[0-9]{1,3}\.[0-9]{1,3}\])|(([a-zA-Z\-0-9]+\.)+[a-zA-Z]{2,}))$'), required=True, help='Please provide a valid email address.', location='json')
        self.parser.add_argument('password', type=str, required=True, help='Please provide a valid password.', location='json')
        super(UserListAPI,


7 条评论
评论者的用户名
评论时间znypt
2019-08-15T17:14:03Z你好老哥
Madman znypt Author
2019-08-15T23:24:50Z你好老弟😂
superyoung9208
2019-08-18T09:56:30Z过来支持下,虽然现在没时间看了
Madman superyoung9208 Author
2019-08-18T10:14:05Z谢谢支持😍
海海东方人
2019-11-06T09:54:59Zclass UserListAPI(Resource): def init(self): self.parser = reqparse.RequestParser(bundle_errors=True) self.parser.add_argument('username', type=str, required=True, help='请输入一个正确的username', location='json') self.parser.add_argument('email', type=inputs.regex('\w[-\w.+]*@([A-Za-z0-9][-A-Za-z0-9]+.)+[A-Za-z]{2,14}'), required=True, help='请输入一个正确的email', location='json', trim=True) self.parser.add_argument('password', type=str, required=True, help='请输入一个正确的密码', location='json') super(UserListAPI, self).init()
这里的 super(UserListAPI, self).init(), 对父类进行 实例化, 为啥要将 UserListAPI 作为参数 传递
tdou+
2019-12-22T09:39:26Z支持支持
jasonzz
2020-03-13T21:32:18Z